Quantcast
Channel: Backstage - Medium
Viewing all 103 articles
Browse latest View live

3 Things We Learnt From Building Gia

$
0
0

“Gia” is Goibibo’s 24 X 7 travel assistant, capable of handling nearly 300 types of queries on travel bookings done on Goibibo. Click here to read more about what Gia can do.

Building any chatbot is very easy because the technology is easily available. But building a chatbot that solves a particular business problem takes time and dedicated effort. The sooner you identify those areas, the faster you can make your bot effective.

In this article we want to share 3 key learnings that helped us in identifying focus areas to improve the user experience on Gia. We hope this helps anyone building a chatbot.

Learning #1: 360 degree learning is essential to understand user behavior

This is a timeless tenet for product folks and most of you might understand it well. So instead of belabouring the obvious, let me give you some examples. When we say 360 Degree Learning, it means picking up signals from anywhere — data, qualitative feedback and interaction design.

Learning from Data

Here was the problem — every week our engineers would build new use cases and release them. But our data was telling us that users weren’t really using them because they just didn’t know about it. And if we didn’t build those use cases, Gia would never be able to answer a variety of questions. Oops, problem.

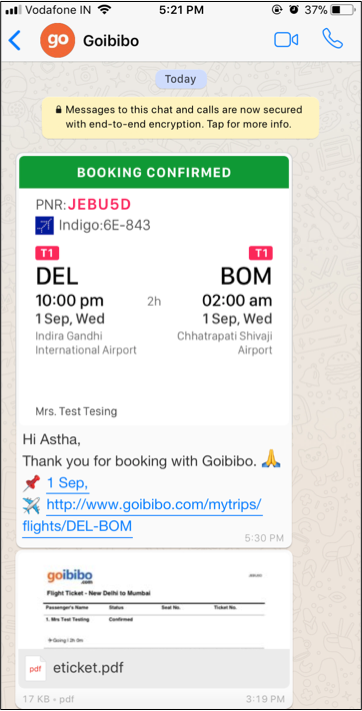
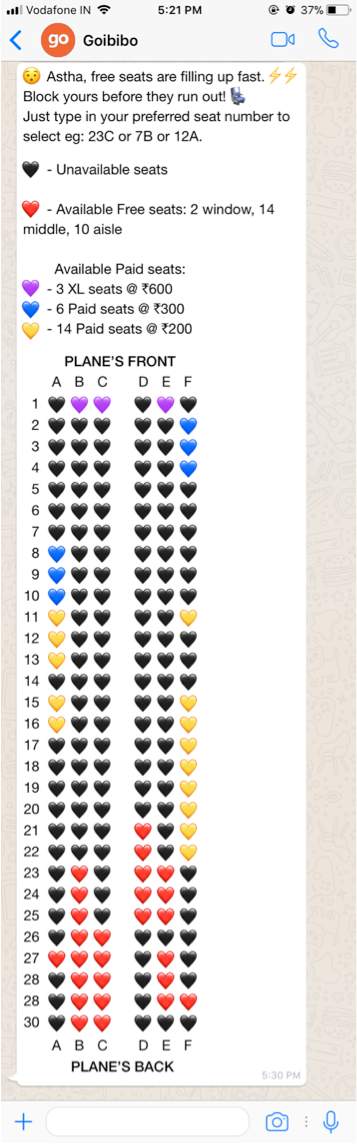
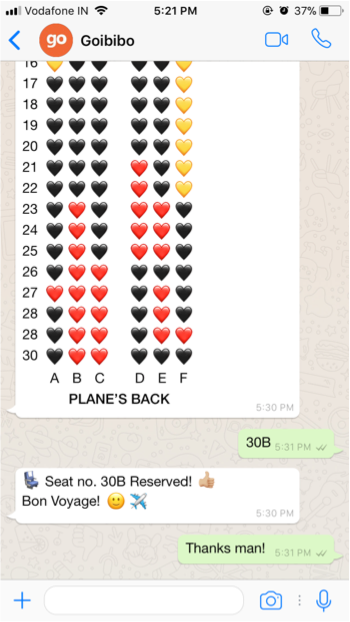
Talking to a chatbot is a lot of like ordering food in a restaurant. Unless you know what the restaurant serves you won’t be able to order. We never walk in and ask for the first food item that comes to our mind. We look at the menu and then order what we want, right? So we needed to build an interface that allowed for this.

The image shows how this looks. With this design, we started observing that discovery of hidden uses started happening

Here is a a second example of where learnt from data. Suddenly, one fine day, we started observing a lot of customers talking directly to human agents — bypassing Gia. We suddenly had big problem on agent staffing. This was surprising to us because nothing had changed on the system to trigger this.

It turned out that a section of users had figured out a way to directly talk to agents by saying “I want to talk to an agent”. They figured out this loophole. Users are smart!

Based on this observation we quickly, enforced a policy that enforced every question to be answered by Gia before being handed to a human agent.

It was a tough call because we also had to introspect on why these users felt the need to bypass talking to Gia. But we didn’t let that learning come in the way of fixing this problem.

Learn from Qualitative Signals

We Indians are polyglots. Most of us find it natural to keep transitioning between English and our mother tongue at will. This habit also exists when we type and we call it the “Vinglish Problem” — vernacular + English.

The image of the left shows an example of a user wanting to know her/his refund status by saying “mera refund kab ayega”. To the best of our knowledge, there is no publicly available dataset for handling this. One of the ways we attempted to fix this is by having a dedicated team which does the priceless job of mapping user messages with what Gia can understand. The taggers can map a vinglish message to what Gia can understand. We don’t claim to have cracked this and are investing in NLP to solve this better.

A second example of learning from qualitative sources is how we rode on an existing WhatsApp paradigm to handle cases when Gia took time to respond. Most of us are habituated to seeing the two blue ticks on WhatsApp and then wait for the typing indicator from the other person.

When we noticed high latency in serving responses in certain cases, we figured using the same paradigm made sense. Of course, we fixed the original source of high latency. But it always helps to have a fallback.

The familiar paradigm for such cases is to show a loader. But on a conversational interface, this approach works for us. It certainly helps if you are using a paradigm that WhatsApp already has established with 300+ million Indian users!

Learn from Design

When our team set out to understand chat interaction paradigms, they came up with an interesting insight. Based on experiments and field visits, we learnt that when presented with a conversational interface users tended to primarily see from top to bottom only.

Usage of horizontal scrolls & bottom-to-top processing was limited. Admitted, these could materially vary for a different user base and for different use cases. But since this was our learning, we have started moving away most other interaction paradigms. This manifested in a major design change for Gia.

We hope the above examples helped you understand how it is important to use every resource available to you to learn and incorporate those learnings. We are just getting started on this journey and future is certainly learning rich.

Learning #2: Figuring out when and how to blend the human agent experience inside Gia

I’m sure I don’t need to explain that Artificial Intelligence (and its sub-discipline Natural Language Processing) isn’t going to work always. In almost all applications there is a strong business case to have a human agent taking over when things don’t go to plan. In the case of Gia as well, we have human chat agents who can continue a conversation and get the issue resolved for our users. But when should the agent come into the picture?

Introducing the Human Agent

While it is possible to automatically invoke human assistance, Gia currently makes this decision on the basis of per-defined end points. Here is an example —

In this case, the conversation was assigned to a human agent when the user indicated that she/he was not happy with the response for a query about refund status. This fires a pr-configured rule that transfers the chat to an agent.

Gia also makes it a point to tell the user that he/she is now chatting with a Support Executive and not Gia.

The decision on when to do this depends on the following scenarios —

  1. Identifying cases when the bot is able to understand the user message & the response is programmable but hasn’t been done yet. We call this as the “Missing Use Case” problem.
  2. Identifying cases when the bot is able to understand the user message but the response can’t be programed because of any reasons (like an external dependency or urgency, etc.).
  3. Identifying when the bot is not able to understand the user message. We call this as the “Missing Intent” problem. This is needed because we are a talkative lot and the list of things we can say could be range from sharing forwards to Good Morning messages and even the odd expressions of love for Gia :)

Setting up with Human Agent for Success

In order to build a chatbot at scale and solving a critical business problem, it is equally important to set the agents up for success. This starts with measuring customer happiness using the interaction. An example of this is shown below —

These responses act as a way to improve the quality of agent conversations over time.

Finally, keep in mind that a bot has accustomed the user to real time responses. So when you transfer the chat to an agent, then it becomes important to reset expectations on how soon you will be able to give a response. The first response time of the human agent is critical to prevent user frustration.

Learning #3: Achieving success requires team work.

We have probably saved the best for the last! In order to achieve lasting customer success it is important to have multiple teams come together. From our experience it is imperative that the following 5 teams come together to make Gia success. These are mentioned in the table below.

Here is a simple representation of what would happen even if one of the teams was not involved.

In hindsight this was obvious to us, but we hope that anyone starting afresh finds this useful.

What does user validation look like?

Along every step of the journey we were making choices that we felt were in the best interest of the user. But the strongest sign of validation from users was when we started observing repeat users of Gia (across many months and multiple transactions) look like this!

Of the users who talk to Gia on a daily basis the proportion of users who have already spoken to Gia in the past rose by nearly 4X! So users who tried speaking to Gia, liked her enough to keep coming back with a new query every time they traveled or had a new trip!

Closing thoughts

If you are still on the fence on whether to do a chatbot, then think no longer. This trend was the strongest validation we’ve seen that users are ready for a conversation experience. You just need to figure out how to make it work for your business!

As a final takeaway, we’d like to repeat the message with which we started this post.

Building any chatbot is very easy because the technology is easily available. But building a chatbot that solves a particular business problem takes time and dedicated effort. The sooner you identify those areas, the faster you can make your bot effective.


3 Things We Learnt From Building Gia was originally published in Backstage on Medium, where people are continuing the conversation by highlighting and responding to this story.


Booking your favorite airplane seat — The Goibibo way!

$
0
0

How many times has it happened that you had to sit cramped up in middle seat because the counter lady told that’s the only option available? Or you have to sit a few rows away from your family on the same airplane journey?

We, at Goibibo constantly strive to make entire travel experience wonderful and memorable. Though travellers were able to book their favorite flights on Goibibo at awesome prices, not getting the desired seats made the whole experience little sour; and affected our NPS too! We wondered, all OTAs have seat selection flows for some time now, then why??

The Product Problem

While everyone like to research a lot to book desired flights at great deals, seat booking is more a mundane task. Post your flight booking, the whole process of logging in, going to “My bookings”, seeing the seats, reserving a seat is a multi step process and only few really enter that funnel. How do we solve this for 95% of our users?

Goibibo has been investing heavily on AI & conversational platforms for sometime now. Read our CTO’s vision here. Through our GIA (In-house intelligent conversational bot) & “Whatsapp for Business” (read here), we already have made things like post bookings queries, e-ticket delivery, hotel reviews much easier.

So, we decided to go the conversational way; thinking Goibibo as the perfect concierge for the traveller. What if a simple message comes in your Whatsapp telling “Your preferred seats are filling fast, reserve yours now?

The Design Problem

In a conversational design approach, the limitations of Whatsapp pushed the team to innovate. There were 4 major problems/limitations we had to solve;
1. Show the entire layout on screen without any redirections
2. Demarcate the different categories of paid seats (Yes front of airplane Aisle is expensive than the rear one)
3. Limit the number of user inputs (To as low as single word reply for free seat!)
4. Make a scalable design (A320 vs A380?)

After a lot of iterations, some design magic happened(Thanks conversational design guru Astha Goel):

Goibibo sends your booking voucher on your Whatsapp.
Intuitive seat layout; with beautiful usage of colourful heart emojis depicting different categories of seats. Why hearts? B’coz that’s the only one with 6 colour options!
If it’s a free seat, all you need is to reply with the seat number. That’s it. Your seat is reserved. For a paid seat, payment link is sent.

Results

Seat bookings increased 5X in the first few days after going live.

And our users are already loving us on twitter :)

Road Ahead

Currently we are live for Indigo bookings, team is working to make all major domestic and international airlines live real quick.

Next time you book tickets with Goibibo, sit back and relax. Your favorite Aisle seat is just a Whatsapp message away!

P.S: Kudos to rockstar team of Goibibo Astha Dixit amit gupta sharath kpa for thinking customer first and executing this beautifully.


Booking your favorite airplane seat — The Goibibo way! was originally published in Backstage on Medium, where people are continuing the conversation by highlighting and responding to this story.

No Strings Attached… Literally…

$
0
0

How do Online Travel Aggregators (OTAs) sell hotels?

To answer this first we need to know from where do we get the hotel supply.

There are 3 sources from which OTA get the supply for hotels.

  1. Direct Contracted Hotels: Hotels makes a direct contract with GoMMT to manage both its static(Content/Images etc) and dynamic data(inventory/rates/offers etc). InGoMMT is a portal to the hoteliers to register themselves and manage their inventory, rates, taxes, room occupancy details (eg: base/max occupancy config), offers, cancellation policies in raw form. Now, various logic applies to this data to make it useful.
    Example: If the base occupancy of a room is 2 and max guest allowed is 3. If a request comes for 3 adults then this means that in this room there will be 2 adults and 1 extra adult. And hence the rates will be picked for base occupancy and extra adult.In this case, InGoMMT’s rule engine takes care of the rule and logic around this data. They are the major contributors to the overall business.
  2. Aggregators: Funnels (The Web Layers) are abstracted from the internal logic applied to fetch the processed data for the hotel. They just get the processed data for that hotel.
  3. Hybrid Model: Hotel gets created at InGoMMT end with the content-only mode (contains only static data). However, the hotelier can create the promotion. With hybrid approach dynamic data like rates and inventory will be pulled from aggregators and promotion will be applied by InGoMMT.

Below is the flowchart explaining how a user request gets processed.

Traditionally on MakeMyTrip or Goibibo a user could only book 1 room type in 1 request. To book another room type users would have to repeat the entire flow and create another booking. This caused 2 problems :

  1. User had to repeat the same flow again. Not a happy experience :(
  2. Let’s say a hotel has 1 Superior room and 1 Deluxe room. Now if a user searches for 2 rooms system would return the hotel as sold out as none of the room types has availability of 2, this right here, was leading to a lot of dropouts of such customers.

Last time I checked I was hired to make customers stick — and I better stick to that!

We needed a way to translate one customer booking into multiple bookings at supplier end. Thus, cart bookings came into being!! In this case, the customer would just tell the total number of rooms and the total number of adults/children and the system has to provide the best possible combination for the request.

Problem Statements

  1. Support for cart Bookings:

What else should I know about cart bookings?
To find the best possible combination, brute force would be to try all the possible combinations and provide the best.

Lets first understand what are the important components of the Sellable Unit of a hotel.

  1. RatePlan: You have a room say Deluxe Room. Now the user can select a meal plan with that room, eg : Accommodation only, Breakfast, Breakfast and Lunch etc. And based on these meal plans the rates can change. The entity which takes care of meal plans and rates is Rateplan.
  2. User Platform: It is important to know that the user is on which platform eg: Mobile, Desktop, IOS as offers can be dependent on the platform of the user.
  3. User Segment: It is also important to know the user belongs to which segment eg: logged in etc. As evident a logged in user can get different perks from a non logged in user.

On average, we have 4 rooms in a hotel and each room has 3 rateplans. So there are a total of 12 sellable units. There are 3 contract types and 3 segment in the system. Both these numbers are on increasing trend. The total as of now comes out to 3+3 = 6. We can have contract type and segment specific rates or offers. Hence, for each rateplan we need to process all the combinations of user platforms and segments.

Now say a user requests for 1 room then we would have to try to find the cheapest among the 12 rateplans. Now to cater this in case of a city search, let’s say we take only the top 50 hotels of the city, this combination would become 50*12*63600.

Look at those numbers — this brute force will definitely push the numbers to some mammoth figure: You see where I am going with this?

Hence the need for a recommendation engine which could take some clever assumptions to reduce the number of possible configurations. Now, this algorithm may differ for different vendors (Goibibo and MakeMyTrip, later more can come). Since one might focus on getting the cheapest option and others might focus on equal distribution of customers among the given rooms.

Since this recommendation engine resides outside InGoMMT, we created a new API Occupancy Less Search, known as such because it does not know the exact room wise occupancy configuration.

The API would respond with all the hotels which can individually satisfy the requested occupancy providing the raw data for rates/offers/taxes etc.

To create a booking at InGoMMT, the vendors needed to find a way to convert the data from Occupancy Less Search API to final selling price.

Now, there were 2 approaches to solve this:

  1. Call an API at InGoMMT which would calculate the final price from the input of Occupancy Less Search API.
    Since the recommendation engine takes in the account each rateplan, it would call 12*6 = 72 times for 1 hotel and 3600 times for each city.
    Cons:
    Even if the recommendation engine reduces the combinations by 50% there would still be around 1200 API calls to cater to 1 user request. This would definitely not scale.
  2. Replicating the logic as residing in InGoMMT at the vendor side.
    Now the vendors had the logic at their end hence the network call time was removed.
    Below is the flow of logic which is replicated at the vendor side.

Cons:
i) Logic replication at 3 places: InGoMMT, Goibibo and MakeMyTrip. This number would increase with the number of vendors. The important point here is that this logic is very complex and a lot of features are built around it causing it to be ever-changing.
ii) InGoMMT owns the logic and communicates same to funnels, though funnels need not understand Hotelier specific logic, still, they have to implement same at their end.
iii) A lot of time was going in vain because of coordination amongst multiple teams to take any feature to live as no feature can be live unless all the vendors are ready.

Now, this approach had started becoming a big problem for us due to the above mentioned reasons and it became very important for us to solve this.

2. Promotion Service for Non-Contracted Hotels

Why do we need this?

Initially, the logic for offers was very tightly coupled with the InGoMMT rule engine. To cater to the hotels integrated with the hybrid model it needed to be decoupled so that offers could be applied on a given price breakup without any knowledge of how that price breakup was evaluated.

How did we solve them

  1. Support for cart Bookings:

Approaches Summary

Below are the two approaches we evaluated:

  1. Bash process: Extracting the above logic in a new repository and running that in a bash process on the client servers.
    Pros:
    This would require us to write the code in one language and network call overhead also would not be an issue.
    Cons:
    This would again lead to a new bash process for each request and given the number of combinations that are processed for 1 request, this would again become a bottleneck.
  2. SDK: Extracting the above logic in a new repository. Since it needed to be used by all the vendors, the first step was to decouple the current logic from InGoMMT and extract in another repo so that InGoMMT also becomes a client for the same.
    Pros:
    i) The ownership to maintain all the SDK’s remain with 1 team and hence the coordination does not become a bottleneck and understanding also remains consistent among all the SDKs.
    ii) Bandwidth is reduced to x/n for any feature development, where x is the number of languages and n is the number of vendors.
    iii) No logic duplication.
    iv) The full development lifecycle has become much more time efficient.
    Cons:
    InGoMMT will have to provide the SDK to the clients in the language used by their platform.

Conclusion:

Based on the above analysis, we went ahead with the SDK approach. Alas Price Engine was born!!

We are gonna make you an offer you can’t refuse!!

Currently, this SDK is only in GoLang. We would also be creating the same in Java. Below is the final flow for shopping cart flow with Price Engine.

2. Promotion/Offer Service for Non-Contracted Hotels:

This was the case of hotels integrated with a hybrid model. Since the offers for these hotels will be created on InGoMMT Extranet we needed a way to apply those offers on the input price as received from Connector Layer (This is the layer which deals with aggregators and hybrid model integrations).

Approaches Summary:

  1. Creating Promotions API : We created 2 apis: GetOffers and ApplyOffers. GetOffers API is very similar to Occupancy Less Search API. The major distinction is that this would provide only offer data for all the applicable offers for an input list of hotels. The ApplyOffers API would take the price breakup as received from the aggregators and apply the offers on top of that and return the final price breakup. This api would support multiple price breakups for a given hotel. The multiple price breakups would be a result of multiple rooms and rate plans at aggregators side.
    Cons :
    In this case, the payload would be very big as apply offers expects the price breakup for each hotel for all the rooms and rate plans. So this would result in parsing the data from aggregators twice. Once would be to convert it to match the apply offers contract and another to match the contract of the Connector Layer. The large request and response would cause a network overload.
  2. SDK : As discussed earlier, the Price Engine SDK can be used here so that this can processing can be done as a function call instead of over the network.

Conclusion:

For now, we have taken the first approach as it also had some dependency at Connector Layer. However, we are working on the SDK in parallel and once done will work on integrating the same.

Below is the flow chart explaining the use of Promotion Service and Price Engine(in later phase).

Current Status and Way Forward:

  1. We have created the SDK in Golang and is currently live with InGoMMT as the first vendor. Due to this, everything gets tested at source and there is no extra overhead of testing and maintenance.
  2. Hermes Layer is in the process of integrating the Golang SDK.
  3. We have Java SDK in pipeline to be integrated with MSE and Connector Layer.
  4. Connector Layer is integrating the promotion service as of now. Once the Java SDK is ready they would start integration for the same.

No Strings Attached… Literally… was originally published in Backstage on Medium, where people are continuing the conversation by highlighting and responding to this story.

Modernising legacy web app

$
0
0

This is the journey of all the things we have done during our migration of our complex InGoMMT’s B2B portal (henceforth referred to as “Extranet”) for hoteliers to manage their listing. Originally the app was written in a mix of Backbone, jQuery and Underscore code served via Django Rest Framework, now it is in the process of migration to a full blown standalone ReactJS web app.

jQuery to React migration (not implying jQuery > React 😉)

First major migration

The first task that needed to be done was to migrate the Extranet code from the Django codebase into it’s own repo and deployment setup. This entire journey has been captured in my previous blog post.

Django Unchained… Literally…

Just to summarise, I am listing down the benefits that we achieved post this migration.

  • The obvious benefits of breaking down the monolith. Can now work on Extranet standalone and ship faster
  • One command to build them all — previously it was a mess with developer having to run a separate script for legacy and react code and commit the built files. With the help of some custom bash scripts we were able to consolidate everything into one single build command.
  • Benefits of Create React App — Babel, ESLint, HMR (yes, this was missing) and added Prettier on top of that too.
  • Benefits to the user — Optimized build process resulted in some size savings as well without making any change. PWA (although not fully utilizable since we still have legacy code shipping separately).

Another major Gotcha I’d like to call out here is that, even though our webapp is a Single Page App, we figured out a way to maintain hierarchy of HTML files that eventually gets combined to one. The how is mentioned in the above post.

Strategies to introduce React into legacy code

Simple Mount

Let’s start with the most easiest and commonly used way. In this, we create a container element in the HTML, and from our JS code we can do ReactDOM.render onto that element.

Conditional Mount

Now as you progress during your migration, you will end up in places where the screen you are trying to revamp will show up conditionally, including the mount point you have. In this case, you can make use of Event dispatches to render the React code. This pattern is pretty powerful to make changes in some part of the screen.

React in the driver seat

So now, with the mix of above strategies, we were able to migrate close to half of our application. But now we were missing a few things which is crucial to the development, as well as sanity of the whole code base as such.

  • We needed Global State (ex: Redux) to share data between React screens
  • We needed to add a new Route with nested routing, which wasn’t possible with the simple routing logic we had.
  • We needed to introduce deep-linking to existing sub tabs we had.

With the above requirements in mind, we decided to introduce React as the entry point of the application, and force legacy code run in some of the tabs instead of the other way around (current situation). With this, we can introduce React Router, and global state (via React.Context) at the top level.

Let’s look at how our web app runs
Old code flow vs New code flow

We need to talk about Hooks

During this migration we also have started to adopt React Hooks. And so far the experience of writing with hooks has been amazing🔥. Listing down things that we found beneficial.

  • We are now writing far lesser code compared to before
  • Our code looks more readable now with“effects” which majorly for us is to run our legacy code in certain places. They are invoked properly and cleanup after themselves too. This enabled us to not migrate legacy code but make it work within some of the routes in React.
  • The code is more readable to someone who is new to React since they don’t have to understand the intricacies of this
  • And we still haven’t gotten around to extracting commonly used code into custom hooks. 😶

Impact

Over the course of all these changes, I would like to call out the impact that we have delivered to the user. After all our commitment is to deliver the best user experience to our customers!!

  • Our web app initial load time has decreased from ~10s to just under 2s.
  • Our Daily Active Users (DAU) have almost doubled post the migration (compared to previous year data).
  • We have cleaned up about ~30k lines of legacy code which remained unused in our codebase. This includes CSS cleanup. Which means the incremental code runs & CSS paints are faster.
  • Previously we were loading all tab’s HTML upfront, now only the relevant tab code is run which is also contributing to the above mentioned reduction.
  • The codebase is now more readable than ever as the role of legacy code has been completely minimised. ReactJS runs the major part of the application.

Modernising legacy web app was originally published in Backstage on Medium, where people are continuing the conversation by highlighting and responding to this story.

My Internship Experience at go-mmt, Gurgaon-2019

$
0
0
Last day with the Mobile Team at go-mmt.

Hello everyone, today is the last day of my Internship at Goibibo and it’s been an amazing journey.

I could not think of any better way than to share my prodigious journey at this amazing company and also to preserve these two most memorable months of my life.

So here is a short but amazing insight into my journey at go-mmt. Hope you enjoy it.😀

My first day started with the orientation program, where all the interns and new hires took part in various activities, through which we got to know each other. Thanks to Mrs. Sakshi Sharma, our orientation concluded with an awesome scavenger hunt.

The next day was the one where I got acquainted with the technology team working on the Goibibo Android Application. Needless to say, I was super excited, and a bit nervous to meet them since it was my chance to be learning from some of the brightest minds in the industry. I would like to shout-out a special thanks to my mentor, Mr. Chandrapal Yadav(Engineer Manager), my manager, Mr. Shashwat Sinha(Senior Engineer Manager), and to the entire team, I had the privilege of working with.

Let’s get down to understanding some of the technical stuff I worked upon. So, I suggest you guys sit tight and enjoy!

Project 1

Problem: Goibibo, like every other application publisher, has to go through the process of publishing updates to the Google Play Store. These updates and any new features take varying amounts of time to reach the masses because of the obvious hindrance, which is either for the Play Store to automatically update the app, which literally takes days before getting installed, or expecting the user to go to the Goibibo play store page to download an update. Thus, the aim was to provide an update to the user inside the Goibibo app about the new features he would unlock access to post updating the app, and in turn, improve the overall user experience. Sounds interesting, doesn’t it?

Solution: Google has started providing an API to facilitate In-App Updates for the application. Thus, my task was to explore the feasibility and quality of the API and ultimately implement it in the Goibibo Android Application.

My first few days went into studying about the API and implementing it on a demo application. I faced a few issues during implementation, some of which were resolved with the help of Mr. Abhishek Luthra(Senior Software Engineer in Ibibo Android Team), while a few required me to explore the web. I even found a couple of bugs in Google’s documentation, which had to be reported to their Issue Tracker. I was eventually able to present a working demo, once these issues were resolved by Google.

I was now ready to integrate this API in the Goibibo application. It was a huge learning opportunity, and an eye-opener, to work on their main codebase. I learned about the various programming practices and patterns, which if followed diligently, ensure lucid code and optimal performance. I was quickly able to integrate this into the main application. After that, just when I thought my task was over, I was presented with the next phase in development, one which I had rarely focused on — Testing.

Thorough testing required me to generate various cases which could lead to possible app crashes or abrupt behaviors. After spending a couple of days on it, the release finally went out. I was so proud of myself that day :P

Project 2

My second task was to show Dynamic banners(which varied according to links clicked by the user) on the login screen of Goibibo Android application under the guidance of Mr. Vivek Walecha who is Technical Lead in Mobile Android Team. Branch.io provides deferred deep links, which facilitates the user to access the precise contents of the application on just a click. My first few days went going through the documentation of Branch.io, after which I started to implement it. During the implementation, I faced a few issues due to which the required flow was not working as expected but with thorough debugging, the issue got resolved. After the implementation was over then again came Testing :P. I started testing the application to generate cases which could lead to issues or abrupt behaviors. After the testing was over, Vivek Sir reviewed my work and the release finally went live.

Project 3

My third task was to revamp the Goibibo’s home screen of the Android app along with Mr. Abhishek Luthra. The key highlights of this task were:

  1. I learned and followed the MVVM architecture pattern for revamping the home screen.
  2. We used Firebase to store and retrieve data for the screen.
  3. I designed various custom views for the screen, implemented using the RecyclerView.

Currently, the task is under testing. Sadly, I could not be a part of it as my internship has ended. 😕

Hopefully, the work will be live in a couple of days.

Knowledge Sessions at Goibibo

One wondrous knowledge session was with Hadi Hariri himself, the keynote speaker of KotlinConfig 2018. It was so remarkable to watch him delivering an amazing session on Kotlin and on some of its key features.

Fun Part

Having discussed a lot about work, let’s move on to the fun stuff. :P

I was one of the lucky interns who attended the GO-MMT Town Hall Meet(THM), where the Go-Trippers gather together with the A-Team. THM is one of the best meets I have ever been to. At THM, a number of cultural activities are performed by some of our talented Go-Tripper’s. There are tech discussions and talks by the A-Team. Finally, we had an awesome DJ, where everyone danced their hearts out.

Overview of my Internship experience

To sum, I would say that these two months were the most memorable ones of my life. Not only did I gain a ton of experience and industry-level knowledge but also made really great friends who helped me learn and enjoy. The atmosphere and the resonant workspace here was so lively that it made me feel comfortable and easy to set in. One great thing I found was the ease of access to just approach any colleague, and their readiness to assist you. If given a chance to come back I would definitely grab the opportunity without a second thought.

The Best Summer of my Life :D


My Internship Experience at go-mmt, Gurgaon-2019 was originally published in Backstage on Medium, where people are continuing the conversation by highlighting and responding to this story.

Developing interactive email with real time dynamic content — Meet “Amp4Email”

$
0
0

Developing interactive email with real time dynamic content — Meet “Amp4Email”

Email is still a preferred way of communication for marketing campaigns, transactions alerts, handling customer grievances, mass communication etc. According to The Radicati Group Inc., the number of worldwide email users will increase to over 2.9 billion, by the end of 2019. Over one-third of the worldwide population will be using email by the end of 2019. But can it be even more powerful? Can we make email more engaging and interactive as if someone is browsing a website? Can we serve real time dynamic data no matter when is it opened? Can we collect information from within the email itself without leaving our Inbox?
Yes, yes. With the Google introducing amp4email, all such things are possible now.

What is amp4email aka dynamic email?

It is a new technology introduced by Google in 2018 which lets you use a subset of Accelerated Mobile Pages (AMP) components in your email to make it more engaging. It is part of AMP project (open source project by Google to make web faster on mobile world introduced in 2015) and it offers Javascript like functionality for email.

Wait, I have heard about AMP

You must have. But amp4email is different from amp4html, though both are open sourced and part of AMP project. amp4email is more restrictive than amp4html for example file upload using <input type=”file” /> is not supported (as of now) in amp4email but it’s there in amp4html.

Okay, but how is it going to work?

Email consists of MIME (Multipurpose Internet Mail Extension) parts such as text/plain for plain text email and text/html for an HTML email. To make the email clients recognize the amp4email, a new MIME type text/x-amp-html got introduced. This MIME part will contain AMPHTML markup.

Most email sending libraries and services already started support for this new MIME type e.g. Nodemailer (a library to send emails in node.js) put support in v6.1.0.

Hmm, interesting. Show me amp4email in action

Yes, of course. Here is one demo in which an imaginary company “Beautiful Flowers Shop” is asking its customers to provide feedback for different flowers offered by company.

dynamic email demo — rating flowers

Awesome! I want to learn amp4email too. Tell me everything

Sure. I can feel your excitement :D Lets get started.
To develop a dynamic email, you will need following four things-

  1. A valid amp4email markup. This would be your email template which would be rendered in Email. You can validate your markup here at https://amp.gmail.dev/playground/. A sample hello-world markup would be something like-
    <!doctype html>
    <html ⚡4email>
    <head>
    <meta charset="utf-8">
    <script async src="https://cdn.ampproject.org/v0.js"></script>
    <style amp4email-boilerplate>body{visibility:hidden}</style>
    </head>
    <body>
    Hello, AMP4EMAIL world.
    </body>
    </html>
  2. An email library which supports text/x-amp-html MIME part in email body. You can use Nodemailer in node.js. An example snippet can be found at https://github.com/varunon9/amp4email/blob/master/utils.js. If your dynamic email is going to contain API calls then you will have to meet CORS requirements. Official documentation- https://developers.google.com/gmail/ampemail/security-requirements
    res.set({
    'Access-Control-Allow-Origin': origin,
    'AMP-Access-Control-Allow-Source-Origin': sourceOrigin,
    'Access-Control-Allow-Source-Origin':
    'AMP-Access-Control-Allow-Source-Origin',
    'Access-Control-Expose-Headers':
    'Access-Control-Allow-Origin' +
    ', AMP-Access-Control-Allow-Source-Origin' +
    ', Access-Control-Allow-Source-Origin'
    });
  3. Testing dynamic email in Gmail. Gmail won’t allow dynamic emails to be rendered (it would be rendering html instead) unless your email domain is officially whitelisted by Google team (step 4).
    But to test your email on some particular Gmail account, you can use dynamic email developer setting to whitelist from address. https://developers.google.com/gmail/ampemail/testing-dynamic-email
  4. Whitelisting your email domain by Google so that your dynamic email is rendered to end users. Once you are ready with your production email, you will have to send it to ampforemail.whitelisting@gmail.com for whitelisting along with filling registration form. A complete information can be found here- https://developers.google.com/gmail/ampemail/register

I am overwhelmed by so much information

That’s okay! Take your time. When we at Goibibo started this POC, it took us only 2 days to develop a dynamic email and test it in our personal Gmail accounts but it took us 2+ weeks to make our email use case production ready and get it whitelisted by Google so that we can send it to our end users. We wanted to send our hotel partners a dynamic email to collect feedback about Extranet (hoteliers platform for managing rates & inventory) and this is what we came up with-

a dynamic email for collecting feedback without leaving Gmail inbox

Conclusion

Amp4Email is really promising and we at Goibibo are going to use it in our email campaigns. There are some initial challenges like setting up infrastructure for handling AMP API requests, training our email-design and marketing teams etc but end results are going to be really awesome.


Developing interactive email with real time dynamic content — Meet “Amp4Email” was originally published in Backstage on Medium, where people are continuing the conversation by highlighting and responding to this story.

Internship experience at Goibibo

$
0
0

From where do I even begin? I am writing this when my internship is about to come to an end, having been a fresher who just completed first year of college, I would like to start off by saying a huge thanks to Goibibo for having given me this opportunity to intern with them.

I still remember the night before my first day I was filled with so many mixed emotions, mostly anxiety and excitement, that I could hardly sleep!

Initially, I was sitting outside waiting to be addressed by the HR, I remember looking around curiously.

The HR introduced me to the team I would be working with. I had to work with the flights team.

I was briefed about the working of the flights booking system and the various tools used for its development that I would need to familiarize with.

This internship was my first step into the corporate world it has taught me a lot about how various teams work cumulatively and handle a plethora of tasks.

Throughout my internship I was given various tasks to perform. It was via these tasks that I received the experience of working with various tools used in development. From using in-house tech, to, committing code to Github, debugging my code, adopting to good coding practices, making efficient use of IDE’s and everything that makes an good developer was there to be learned.

I would like to thank my mentors, who did not spoon feed me but helped me whenever it was required.

Things I loved here

  • The office timings are flexible and they value the work rather than the timings.
  • No specific dress code, so you can wear shorts and slippers if you like :P
  • Birthday celebrations that were made here.
  • Gaming! Table Tennis, FIFA, Carrom and what not!
“Learning is not attained by chance, it must be sought for with ardor and attended to with diligence.” ―Abigail Adams

The kind of freedom and progressive office work culture here was overwhelming. Now, I will be returning to my college for the start of my second year, and this experience I shall always remember and nurture throughout my career

Thank you Goibibo for an unforgettable experience!


Internship experience at Goibibo was originally published in Backstage on Medium, where people are continuing the conversation by highlighting and responding to this story.

My Experience As SDE Intern @ Goibibo

$
0
0

Hello Readers :) ,

I am Anshuman , a final year Computer Engineering student @ Delhi Technological University and I just got over my Summer Intern At Goibibo.

As you know from the title , I’ll be sharing my internship experience with Android team at Goibibo , Gurgaon , which has been amazing . My Intern duration was of 2 months , June & July 2019. I am a fan of breaking bad , so please don’t mind the references :P .

On first day, we were made familiar to the work culture & policies of Go-MMT. We performed many team bonding activities , and were given goodies at the end of the day , which was like cherry on cake.

The next day started with Isha Monga, Deputy Manager- Human Resources, introducing me and fellow interns to the HR team members .

Nurpur Roy, Assistant Manager HR , then introduced me to the android team and my mentors Ashok Kumar Singhal ,Lead Software Engineer, And Shashwat Sinha , Engineering Manager. I worked with them in “Experiences” vertical of the main Goibibo Android App.

We then attended stand-ups , which used to happen daily at that time :P .
Ashok then explained what the project was & what its impact will be . He gave me liberty and freedom to express my thoughts and give insights. As I had no prior professional experience in Android , he advised me to revise my basics and learn Android Architecture.
So after developing a basic ground in Android, we were ready to start implementing our project.

In easier words — the project was to develop “Time Bounded Deals” (Couldn’t reveal details , because its not live yet :P ) . The idea was to have deals starting at fixed time with great offer to increase user interaction and engage them in the application . Each deal had start time & end time . After the successful enrolment of the user we would then announce the winners of the deal.

It sounded simple , but it turns out we were dealing with 7 deal phases of each deal along with their Deal timers on the screen .
I first started by building all the layouts of the project, and took time in the beginning , but then with the help and guidance of Ashok , I got into the flow.

Now the things started becoming challenging.

So you want to show each deal with a countdown timer . How do you do that ? Make a separate thread to update the deal time of each deal , Right ? But it turns out, that if the number of deals on the page reaches, a small number like 20 , your android OS might kill your application because of excessive memory usage , also even if the OS allows you take up this huge amount of memory, you can only imagine how difficult UI-rendering will be for user.

Now the challenge was to reduce memory usage and have efficient UI , without lag as we are dealing (pun intended) with a special deal with a huge audience taking part and announcing winner , it will be unfair and frustrating for users.

We solved the memory issues by using a Singleton Timer Class which would provide current time to any entity which subscribes to it. We initialised the timer class from the current time provided by server.

UI rending issues were resolved by efficient use of LiveData & Data-Binding. I think they are life savers for an android developer and are the latest technologies in Android to work on ( you can read about the Android JetPack Library if more interested in them).

So are we done with the project ?

Actually it had a major drawback ( hack in some way). A user while waiting for the deal to end , might keep the activity in background and change the device time and that , for some unknown reasons , changed our deal timer’s time. Weird isn’t it? Our deal timer was supposed to be independent of the device time as we initialised it with time provided by server.
After spending time with the bug and going to through deep corners of Internet. We found out the kind of thread we were using in Singleton Timer Class was itself OS clock dependent (to trigger it every second) , we then found alternative to it , which was ExecutorService .

Till this time I was working in Java and now we had to build the second half the project which was winner phase/list of the users. Ashok was open to my idea of now shifting to Kotlin and developing rest of the project in Kotlin to add more fun :) . So I learned Kotlin using the online courses (free of cost , thanks to Go-MMT :) ) , which were suggested by other team members . Kotlin saved a lot of our time and handles most of the thing on its own.

Then we had several meetings to discuss the bugs , more features to be added , and feedbacks . I had a lot of fun in the discussions , everyone was humble and open enough to let me give my feedbacks as well.

My journey has been really challenging. I gained the knowledge of how the “Real_Coding_World” is. I learned the true meaning of Abstraction , it is not just some word in books & The art of debugging .

I was lucky to have Ashok & Shashwat as my mentors ,and work with such a amazing team, apart from the knowledge of Android , they taught me how humble a person could be and how we can solve our problems as a team. I was trusted with my code and was not spoon-fed every detail , so it made everything more interesting and challenging (& you know its the best combination). In short , it has been a really great experience :) .


My Experience As SDE Intern @ Goibibo was originally published in Backstage on Medium, where people are continuing the conversation by highlighting and responding to this story.


Dependency Management in Go

$
0
0

Executive Summary

This paper talks about the shortcomings of dependency management in Go and ways to solve it.

What is a dependency?
Dependencies are packages which are required for your projects to run. For example, if your project uses protobuf package, then protobuf is a dependency on the project. Dependency management is important to get right for any programming language, and with Go, this has been tricky since its inception.

Problem Statement

Initially no dependency management system existed in Go and ‘go get’ was the only way to download dependencies which pulls the code from the master branch of a repository. This right here is a time ticking bomb.

We ran into this issue once on production, and that was the triggering point where we started researching the possible solutions for managing dependencies.

Solution Approaches

We analyzed third party tool like dep and concepts such as vendoring (it’s an approach where all the dependencies are kept inside vendor folder in the codebase) to manage the dependencies. We also analyzed Go’s new dependency management system (Go Module) introduced in Go1.11.

Comparison of solution approaches

Analysing the pros and cons of these solutions, we preferred ‘Go Module’ due to the following reasons:

  • ‘Go Module’ provides a much cleaner way to manage dependencies as compared to any other solutions.
  • Since it comes with the language, no need to install any third party tool like dep.
  • It is the future of dependency management in Go. Go community is actively working on it, many new features will be added in the future releases.
  • Provides a feature for warming caches in docker builds which helps in reducing deployment time

What is Go Module?

Go Module is a new dependency management system inbuilt in Go that makes dependency version information explicit and easier to manage.

A module is a collection of Go packages stored in a file tree with a go.mod file at its root. The go.mod file defines the module’s module path and its dependency requirements. Each dependency requirement is written as a module path and a specific semantic version.

Go 1.11 and 1.12 include preliminary support for modules.
Starting in Go 1.13, module mode will be the default for all development.

How to enable module support on Go repositories?

It’s very easy to enable module support on go repositories by following these steps-

1. Upgrade Golang version to 1.12.x  
2. Navigate to the root of the module's source tree and create the initial module definition by executing the command 'go mod init'. This will create go.mod file.
3. Execute 'go build'. This will add all required dependencies in go.mod file and create go.sum file for checksum. Sample go.mod file-

module <my-package>
go 1.12
require (
github.com/gin-gonic/gin v1.4.0
go.uber.org/zap v1.10.0
google.golang.org/grpc v1.21.0
)
Incase your project is already using dep tool for dependency management, go build takes care of the versions mentioned in dep file and creates go.mod file accordingly

How deployment time got reduced using Go Module?

The build time of Go Docker image is always a pain as there was always a need to do ‘go get’ for building the binary. This resulted in fetching the dependencies every time we wanted to build the image. The Dockerfile looked like this-

FROM centos:latest
RUN wget https://storage.googleapis.com/golang/go1.12.5.linux-amd64.tar.gz && tar -C /usr/local -xzf go1.12.5.linux-amd64.tar.gz
COPY . /usr/local/src/mypackage/
RUN go get
RUN go build -o /go/bin/hello

However, this Dockerfile comes with a major flaw because we are copying the source code every time first, all other layers are uncached, thus go get must be executed again.

Go Module provides ‘go mod download’ command, which downloads the dependencies mentioned in go.mod file instead of using the source code. As dependency file do not change frequently, they can be simply cached by the COPY command from Dockerfile as shown below -
FROM centos:latest
RUN wget https://storage.googleapis.com/golang/go1.12.5.linux-amd64.tar.gz && tar -C /usr/local -xzf go1.12.5.linux-amd64.tar.gz
# COPY go.mod and go.sum files to the workspace
COPY go.mod .
COPY go.sum .
# Get dependancies - will be cached if mod/sum is not changed
RUN go mod download
# Copy the source code as the last step
COPY . /usr/local/src/mypackage/
RUN go build -o /go/bin/hello

We used the above technique and got tremendous improvement in our deployment time for our Go repositories. For e.g. deployment time for one of our microservice goku on production reduced by 60%

What if your project has private package dependencies?

The problem with private package dependency is that Go doesn’t have the credentials to download it.
One of the way to solve is by creating a user having read access to that private package and use the user token/ssh public key to download these dependencies. We used the above technique in one of our Go project.

Having said that, this is not the ideal or cleaner way to do this, cleaner solutions will come from using GOPROXY something like Athens which can be configured to do all this for you with you only having to set GOPROXY on those hosts that need to fetch private modules.

So we can conclude…

We have implemented Go module for all our Golang repositories and it’s been a month now, we have not faced any issues in deployment or while working locally.

We have achieved the following improvements -

  • Upgrading/downgrading of third party packages is much easier now, just update the version in go.mod file
  • With complete control over version of third party packages, it makes us confident about code robustness and integrity
  • Deployment time reduced massively for production and other staging environments

Future Scope

1. GOPROXY setup to solve the issues for downloading private packages and caching public packages at GOPROXY so that packages can be downloaded fast.

2. Setup a domain with go.mycompany.org which will serve metadata for ‘go get tool’ like-

<head>
<meta name="go-import" content="go.mycompany.org/package git https://github.com/mycompany/package">
</head>
  • With this we will be able to import the private packages like
    import "go.mycompany.org/mypackage"
  • No need to change the code if we change our code hosting site in future. We just have to change the meta information for ‘go get tool’.

So what are you waiting for? We have found our Mr. Dependable in ‘Go Module’, you can find yours too for managing your project dependencies !!


Dependency Management in Go was originally published in Backstage on Medium, where people are continuing the conversation by highlighting and responding to this story.

Mr. Postman for Integration Testing

$
0
0

Integration Testing

Yes we do unit testing, we do integration testing but everytime we write a new api do we test the schema and positive + negative test cases religiously, most of the time the answer will be NO. Integration Testing is a level of software testing where individual units are combined and tested as a group.

integration-testing-heirarchy

Why Postman?

We had created something called Lakshman Rekha (centralised integration testing platform) in the past and then every microservice needs to integrate with it to TDD/BDD the test cases. 2 problems — Maintenance and Adoptability of the Lakshman Rekha itself. Thus we chose Postman because it is handy, developer use them on day to day basis and it provides separate workspace for different teams + well groomed documentation.

What is Postman WorkSpace?

We performed some R&D and found out Postman can be used for Integration Testing with a simple learning curve of chai.js and one time learning of Jenkins integration. Thus we bought the Postman Pro license and created different workspace (a workspace isolates your development, testing and production deployment by sharing collection and allowing you to manage roles of different developers)

  • My WorkSpace — Directly links with your Postman Client (local)
  • Team WorkSpace — This is the one you create for your own team (prod)

Most of the team will have either Viewer or Editor roles in these workspace.

How does the Tests work?

If we all understand Postman Collection then the tests/assertions can be written under 3 levels — Collection, Folder and Request

postman tests run execution flow

And this is how you structure and run the whole collection i.e.

Create Collection for your microservice > Create Folder for each module > Add Requests with Positive/Negative Tests >>> Run

We have following 5 thumb rules for the process point of view

1) Workspace should have collection same as Github repo name

2) Each collection should have module based Success/Failed cases

3) Fork and Merge request — Postman Collection <collection_name> merge request email

4) Always work on MyWorkSpace and raise a request to Module Owner to merge the changes to Team WorkSpace

5) Integrate your repo’s collection with Jenkins job for deployment

Who is this “newman”?

Once the collection is ready with requests and tests you would like to run them and there are various ways you can run them

different ways to execute/run postman collection

Everybody wouldhave tried In App (Postman Client) runner but Commandline and CI Builds run via newman which is a command line collection runner for Postman. Simple to install npm install newman and check newman — version (we use 4.5.1), Copy the shared collection url and

newman run <shared_collection_url>
(This is the most easy way to run for your Postman collection)

What about Collection URL security?

Yes, the shared collection URL is a security threat and sharing it over network via Jenkins command was also a concern so we discussed with Postman team and figured out we can use Postman API as a safe option which converts the command line script from newman run <public_shared_collection_url> to

newman run https://api.getpostman.com/collections/{{collection_uid}}?apikey={{postman-api-key-here}}
or if you are interested to pass your specific environment global variables then the newman run command changes to
newman run https://api.getpostman.com/collections/{{collection_uid}}?apikey={{postman-api-key-here}} --environment https://api.getpostman.com/environments/{{environment_uid}}?apikey={{postman-api-key-here}}

Show me the Flow Diagram?

Workflow based on Continuous Integration setup

Impact

We took 2 of our micro-services integrated with Jenkins job (Pre-Deployment)

test execution results using newman (Terminal)

Currently both the services are running these test cases daily before the deployment and they hardly take 1 min :)

References


Mr. Postman for Integration Testing was originally published in Backstage on Medium, where people are continuing the conversation by highlighting and responding to this story.

Internship Journey With Goibibo

$
0
0

“The expert in anything was once a beginner”

Finally it’s the end of my 2 months internship with the best Tech Travel Aggregator brand — GoIbibo and I’m taking so many memories along that will be long lasted. The real value of college education comes when you apply what you learn and I got this perfect opportunity with GoIbibo.

I was the happiest when I received the intern confirmation E-mail and started brushing up my basics of python language I thought I’ll be working on for the next two months. But to my surprise python was just the center piece to the puzzle I had to complete in the coming months. I am grateful to my GoCash team members & the DevOps team who helped me and guided me throughout the project and special thanks to Phani Sir and Manasa Ma’am for mentoring me.

On the very first day I was late to the office thanks to Bangalore traffic and my anxiety levels rose with every passing minute. Finally, I reported at the office reception and my reporting HR Harshal Sir received me and introduced me to my team. At first I was nervous as I had a little performance pressure but it didn’t take me long to settle and I started enjoying my work. Our team had daily stand-ups for analyzing the work progress of every member and handling issues in our subjects of interest collectively.

The main work that I was assigned was to write the unit test cases for GoCash. During the unit testing itself I learnt about how and what response do we receive on hitting an API and used Postman application for the same. So, to validate the test cases we made a test database in the local itself and passed some input which was fed to the test database and every time when an API was hit, we asserted the API response with the test database.

I wrote two or more test cases for every API.

1. Successful Response: The appropriate input gave the positive response on hitting the API.

2. Internal server error: When either the user id or email id was missing from the input.

3. Invalid Request: Incorrect parameter passed as an input.

4. Cap restriction: When a fixed upper limit amount has been reached.

We dockerized the whole process by running the test in containers. We used Docker as a part of our process so that there remains no database dependency outside the test environment. So, what we did first was we built docker images for 2 containers through docker-compose file. First is the test container in which we will run the tests (gocash:latest) and the other is the database container (test_gocash_db) which will host the database for running the tests. A schema file was used to add all the create queries of all mandatory tables of GoCash.

For making this entire process efficient a docker-compose-test file was created which was configured in such a way to keep the testing container running and the database container can be created any number of times depending on the changes made to database . I also created a shell script which had all the commands for docker running automatically.I used pytest for testing as its more compact and clearer.

Sequence in which test cases were executed in docker:

  1. Create the docker images.
  2. Build the docker containers for the desired docker images.
  3. Enter the testing container and run the test cases using pytest.
  4. Remove the containers.

The second piece of work I worked on was GIT Hooks. GIT hooks are scripts that GIT executes before or after events such as: commit, push, and receive. My main motive was to build a .pre-commit-config.yaml including all the pre-commit hooks which I was asked to include so that no modified file can be committed containing errors to the remote repository.

Also I created a commit-msg hook which kept note that no file can be committed without JIRA issue key.

Summing up everything I’d like to thank the entire GoIbibo family , my GoCash team — Phani Sir , Abhirama Sir , Manasa ma’am ,Tushar sir and everyone . I had the best time here, learnt a lot and enjoyed a lot as well . And how can I stop myself from mentioning the GO-MMT Town Hall Meet (THM) where the Tech Talks were really informative and danced my heart out on the DJ later that day . These two months were the most memorable ones of my life and if given a chance to join back again I won’t think twice before rejoining the GO-MMT family.

Thank you GO-MMT : D


Internship Journey With Goibibo was originally published in Backstage on Medium, where people are continuing the conversation by highlighting and responding to this story.

Delta-Spectrum Connector

$
0
0

Delta to Redshift Spectrum Connector

Context

At Goibibo, we are heavy AWS Redshift users. Now, Redshift has served us very well over the years, but it’s definitely not suitable for all use-cases. Specifically, it’s not meant to be used as a data lake, but our production Redshift cluster had morphed into a data lake over the years. Redshift is not very suitable as a data lake, and you cannot scale it up without downtime. So we decided to migrate some data away from Redshift, and keep it in S3. ​ There are two things to consider when building a data lake: ​

  • How to ingest data into the data lake,
  • How to query data in the data lake. ​

Queries

The query engine was an easy choice for us: Redshift Spectrum. ​ Redshift Spectrum provides us a way to query data kept on S3, and reuses some of Redshift’s infrastructure. Spectrum’s SQL dialect, is also very similar to Redshift’s dialect, so it was easy for our analysts to use.

This is important to us, because at Goibibo, we have lots of analysts, and thousands of pre-existing queries, lots of them pretty hefty queries, that would be tough to migrate to a different SQL dialect. This consideration also ruled out AWS Athena. Spectrum isn’t perfect, especially with nested data, but it was the best compromise for us. And so we started using Spectrum. ​

Ingestion

We pointed our existing ingestion jobs(written in Spark) to S3 instead of Redshift. This worked, however, S3 is not a database, and by itself, it doesn’t have any ACID guarantees. Some of our critical jobs, which affect our company finances, depend on the consistency of data in our data lake, so ACID was important for us.

​This is where Databricks Delta came in. Delta provides ACID guarantees on top of S3, building MVCC-like features on top of a log of transactions, which is called the DeltaLog. ​ While there’s some value to the argument that we should either stick to either Redshift or Databricks for all our query needs, given our requirements, it wasn’t immediately feasible. ​ So we set about building a Delta-Spectrum connector: ​

Delta​

Files in Delta are just parquet files, and meta-data is stored in the DeltaLog, which is just a collection of json files stored in a S3 subdirectory. ​ The DeltaLog contains an ordered collection of all transactions on the Delta Table, and also keeps tracks of meta-data such as operation type, partitions changed, files changed, alongside min-max statistics. For efficiency, there are also regular snapshots of the DeltaLog, which is stored in parquet format. ​

Since Delta stores the data itself in parquet format, Spectrum can also immediately query this data. However there’s a catch: Delta doesn’t delete old files when it is deleting or updating data, instead it updates its metadata in the DeltaLog. If we query this data through Delta, it reads the data and ensures that only the correct files are queried. Spectrum itself doesn’t have a clue. ​ ​

RedShift Spectrum Manifest Files

​Apart from accepting a path as a table/partition location, Spectrum can also accept a manifest file as a location. This manifest file contains the list of files in the table/partition along with metadata such as file-size. ​ Our aim here is to read the DeltaLog, update the manifest file, and do this every time we write to the Delta Table. ​

Note that Databricks’ Athena connector does the same thing, however Athena and Spectrum do not have the same manifest file formats, so you cannot have an external table that you can query both via Spectrum and Athena. One workaround is to create different external tables for Spectrum and Athena. ​

As of now, Databricks Delta doesn’t have stable APIs for reading or manipulating the DeltaLog. But at its heart, the DeltaLog is just a collection of json files, so it’s easy to read and parse:

The Connector

​Our DeltaToGlue (as we’re calling it) connector, has had two major versions till now. The first version was fairly simple. It used to read a list of files from the DeltaLog, generated a manifest file and then updated the table location in the AWS Glue Data Catalog, to point to this manifest file.

This worked only for unpartitioned tables, as partitions need to have separate manifest files of their own.

​Then we added partitioned-table support, and started pointing all the partitions to their manifest files individually. Typically, however, a single write on a table affects only a few partitions. Our approach was fairly inefficient because it wrote manifests for all partitions, even if only a few partitions had changed. ​

We looked at the information that DeltaLog provides, and we found that it stores partition values, along with the files written in those partitions, alongside each write transaction. ​ In the catalog’s table properties, DeltaToGlue stores the Delta version of the table for which it was last run. On a subsequent run, DeltaToGlue then figures out the partitions which have seen an update, and goes and updates the partition manifest files for only those partitions! Much more efficient. ​

Performance

​ We saw a huge increase in performance of queries on Spectrum, after moving to Delta. Much of this can be attributed to the OPTIMIZE function that Delta provides, which merges small parquet files written by scheduled batch jobs, into a bigger file that is more query-friendly. Delta manages to do this while maintaining consistency! ​ Here are some before and after figures for a sample query: ​

​ The left table shows the query results for a table we already had in Spectrum before we moved to Delta. The right table is a Delta Table for the same data. There are no differences between the tables, except that the Delta Tables are optimized(but not by z-order). ​ This isn’t a very scientific test, but we saw roughly the same performance by repeating queries(the size of the table seems to have prevented caching!), and a similar speedup in most read queries. ​

What’s next:

​ At the moment, we run deltaToGlue after each write manually in our code. Ideally, we’d like to hook into Spark to do it automatically. ​ Spark 3, not yet released as of the date of writing this post, should help by allowing custom spark catalogs. Not only would that simplify all our AWS Glue specific code by having a inbuilt Glue Catalog implementation in Spark, it would also allow for custom-built dual catalogs, that can update Spark, Spectrum or Athena tables, all in one go.

Usage Example:

Links:


Delta-Spectrum Connector was originally published in Backstage on Medium, where people are continuing the conversation by highlighting and responding to this story.

Hotel Dynamic Pricing

$
0
0

Executive Summary

This article talks about building a dynamic pricing model for hotels based on the hotel’s intrinsic value (star rating, amenities, locality), seasonality, user perception and market factors like demand & competition.

What is Dynamic Pricing and why hotel partners need it?

Dynamic Pricing is a pricing strategy in which businesses set flexible prices for products depending on current market demands.

Dynamic pricing is the standard method of pricing in the tourism industry. Higher prices are charged during the peak season, or during special-event periods and hotel partners may just charge the operating cost during the off season. A simple dynamic pricing strategy can be defined based on demand categorisation (High, Medium and Low) as twice the base price during High season, half the base price during Low season and equal to base price during Medium season.

While the objective during peak season is to capitalise on demand and maximise revenue, during low demand objective changes to increase occupancy and get more return on fixed costs. Dynamic pricing helps hotel partners achieve both and is the most important aspect in revenue management.

Revenue comparison — Static vs Dynamic Pricing

In the first case, the price is kept constant irrespective of demand and in the second case it is changed according to the demand. The gain in revenue can be seen in the above figure.

Problem Statement

Currently, less than 10% hotels are pricing dynamically based on analytical tools. About the rest, the majority of them just go ahead with intuition and change price seasonally. They look at competitors and some other market signals to decide about the increase/decrease in price. Our ultimate goal was to build a platform where we can recommend automated dynamic prices for upcoming check-ins for hotels given real time market data. The recommended price should be the data driven optimal price for which the algorithm infers will be the maximum revenue for each hotel. More money for hotel partners mean more trust with the product.

Solution Approaches

  1. Price Elasticity of Demand -Develop a model to predict the number of rooms sold as a function of various market factors and Price. The model will give the coefficient corresponding to price and hence an ideal range can be obtained which maximises the expected revenue, in this case Expected Revenue = Price * Expected Rooms Sold

The graph above depicts box-plot distribution of bookings across advance purchase (AP) window and day of the week. It can be seen as AP window gets close to 0, the box plot gets wider and volatility becomes huge; so no matter how complex model you try, prediction interval will remain large! Basically under similar circumstances with respect to seasonality, demand and occupancy, when it comes to number of rooms sold in last days, it has a wide range. We know from past bookings data on our platform that more than 50% rooms are sold in last 2 days where we are not very sure about the prediction being accurate. So predicting sales at an AP window level is not going to work.

2. Price as a function of regressors -

This approach can be summarised in three steps -

a. Define good hotels based on no. of bookings, booking amount, conversion rate etc. on our platform

b. Select top 100/500/1000 of them and understand their pricing strategy, basically build a model keeping price as the dependent variable.

c. Generalise the strategy to hotels population.

Note: While sampling 100/500/1000 hotels make sure there is a good mixture of hotels based on ADR (Average Daily Rate), star rating, location and amenities.

Modelling Approach and Deployment

Based on the current model, we are recommending price to the hotel partners at a room, meal plan, occupancy level for next 60 checkin dates. The hotel partner gives a lower bound for every room with its basic plan and after comparing it to the recommended price, final price is calculated as the maximum of two. Final price is synced with Channel Manager and there it gets pushed to different OTAs. Pricing beyond 60 days can not be generalised based on the current model’s output, so we are looking at the demand and events pattern in the next 365 days to recommend prices for check ins between advance 2 month period to 365 days.

As we observed, for most of the hotels active promotions and coupons fetch better conversion rate. So the price calendar for the hotel is adjusted according to the active promotions and coupons as well.

How Retailers Can Maximize The Power of Coupons

Performance So Far…

A good pricing strategy is the one which helps hotel partners increase revenue or occupancy or both in a given timeframe. The standard industry metrics is RevPar (Revenue per available room) or Yield which takes into consideration the money made and fill rate both. There are two ways to validate the pricing algorithm -

  1. A/B Experiment: Split users population into two sets randomly and display already existing price in one set and model recommended price in another. Define a time frame (week/month/quarter) and compare the RevPar in both sets at the end of time frame.If there is a significant gain in RevPar due to recommended price, we can conclude the pricing strategy has worked! But wait, hotel partner can not do that as it will lead to price disparity. So A/B test can not be implemented.
  2. Normalise Dynamic Factors and Compare RevPar: If 1000 users clicked on a hotels page in July 2019 and 500 users in August 2019, and let’s say the hotel partner agreed to implement our model from 1st August 2019; to ask for an increase in RevPar at the end of August is a bit unfair, isn’t it? Hypothetically if the RevPar is 10% more than half the RevPar in July, the new pricing strategy has worked!

While comparing business metrics in two different time periods, all major market factors should be comparable. So what are the major market factors in this case?

  • Demand — Defined as the total number of unique visitors coming to the hotels page.
  • Competitors Info — Includes the total number of hotels, their number of bookings and amount of bookings in that locality.
  • Funnel Discount — “What you see is what you pay”; Users see final price and then decide to book a hotel or not. Whatever hotel partners display as rack rate does not matter to the users but the final payable amount, thus OTA discount plays a crucial role in conversion! If the discount decreases by 50% after model was implemented, it will adversely affect the yield.

We analysed performance on all the 15 hotels we recommended price to. First we categorised last 2 years into 3 different buckets as -

If a hotel partner is using our product from 01 Aug 2019 to 15th Sep 2019 (45 days, lets call it Post Live Period),

We define:15th Jun 2019 to 31st Jul 2019 as Pre Live Period (45 days) and 01 Aug 2018 to 15th Sep 2018 as Post Live Period Last Year

DI is defined as the ratio of self demand and competitors demand; BPDI is defined as the ratio of self booking per unit of demand and competitors booking per unit of demand
FDI is defined as the ratio of self % discount and competitors % discount; CRI is defined as the ratio of self conversion rate and competitors conversion rate

Based on the charts above, we did best in terms of Revenue and conversion rate in Post Live Period after adjusting demand for these 15 hotels.

Product Current Features

  1. Data Driven Pricing (Pricing based on real time market data and advanced ML algorithms)
  2. Automated Pricing (only requires key input such as base price and meal cost; Price is generated through configuration manager and pushed across all OTAs using Channel Manager API)
  3. Promotion Support (We also recommend coupons and promotions to hotel partners, prices are accordingly scaled up)
  4. Periodic Performance Report (Provides clarity to hotel partners about their performance along with key insights like price should be decreased because demand has decreased and/or competitors are also charging less)

Challenges

  1. Difficult to explain data driven solution in Indian market.
  2. Lack of online market penetration for most Indian hotels; thus less data.
  3. Blocked Inventory in peak season due to high offline sales.

Whats Next?

We trust our pricing, but it takes some time for hotel partners to trust the same. As a future plan, we will give the exact breakup of price so that the end user is able to relate why the price increased or decreased.
Define competitors based on analysis and extend price recommendation to a year. Compare demand and price with the competitors for next 365 days.
Add user level segmentation like flavour to the final pricing.
Derive base(intrinsic) value from hotel and room amenities rather than an input from the hotel partner. Obviously the hotel partner will be aware of the derived base price and their agreement will be compulsory.

In a world surrounded by data driven solutions and AI, it’s wise to not leave any money on the table and price your product exactly how it should be priced at a given time for a given user. Because, DATA MATTERS!


Hotel Dynamic Pricing was originally published in Backstage on Medium, where people are continuing the conversation by highlighting and responding to this story.

The Power of Community: Crowdsourced Insights

$
0
0

Empowering continuously generated hotel reviews

When booking a hotel online, we like to access as much trustworthy information as possible to make the decision easier. One of the most important steps towards this is, reading customer reviews to get details about the hotel, its food, location, hospitality, amenities, connectivity, and everything else that matters to us individually.

Sometimes looking for a specific piece of information in the reviews may feel like looking for a needle in a haystack. To assist our users in this aspect, we summarized the reviews by extracting their key topics and sentiments to give an abridged, yet informative overview to our customers.

Example of key topic extraction and sentiments

Why Crowdsource Further?

In most cases, key topics help the users in figuring out various vital aspects MENTIONED in the reviews. But sometimes they are unable to provide information about some very specific facets of a property, especially when the review content is thin.

To generate additional richer information, we created a framework to crowdsource data from our community of users.

Using crowdsourcing, we seek specific information from our users about those aspects of a hotel that we believe are important while making a booking decision. Some such aspects are hotel amenities, hotel location, safety, connectivity, etc.

Our community provides insights on various data points. Some of the examples are :

‘Does this hotel have a swimming pool for kids?’ (sought from family travellers )

‘Did you like the hotel location ?’,

‘Which is the best Indian restaurant near the hotel ?’

Flowchart for the crowdsourced data collection process

Structured versus Unstructured Data Collection

Unstructured Data Collection: When users are free to submit their responses in a free-flowing format. Reviews and text-based answers belong to this category.

Structured Data Collection: When users can only submit their responses in a pre-defined format and can only select from a set of predefined options.

Via crowdsourcing, the data is collected primarily in a structured format.

Components of Crowdsourcing data aggregation

Various components of crowdsourcing

Crowdsourcing framework consists of components which can be utilized in isolation or as a set, to aggregate multiple facets of information.

The current set of integrated components are :

  1. Binary: A binary response is a response in the form of ‘Yes/No’. This is apt for questions where we are seeking validation of certain facts or are seeking the opinion of the user about certain amenity/facility. A question like, “Does the hotel have a swimming pool?” elicits a response in the form of ‘Yes/No’.
  2. MCQ: This response type is used for questions where a user can select responses from a multitude of options. Questions like “Why did you like/dislike the swimming pool?”, “What was served for breakfast?” are apt for this response type.
  3. Map: This response type is used to collect geoinformation about restaurants, metro stations or any other POIs near the hotel.
  4. Image: This response type is used to collect images of various facilities and amenities in the hotel as-is.

Further capabilities of the platform

Nested information seek:

One of the key capabilities of the framework is to be able to collect responses for a particular topic in a sequential manner. This helps us know about the salient features of a topic in-depth.

Example of a nested information flow

Segmentation Capability:

Another key capability is to be able to match a specific set of questions to a specific set of travellers. This is done on the basis of the relevance of the segment to the information being sought. Some examples of segmentation:

  1. Creation of a segment of properties where we want to measure and validate user experience
  2. Creation of a segment of properties where we want to seek data specific to the Indian audience.

Key benefits of Crowdsourcing

  1. Continuous Audit and Quality check capability: As mentioned earlier, crowdsourcing provides us with the capability to audit a specific set of users/hotels by asking them to choose from predefined answers. This not only helps in saving overall operational effort but also optimizes the turnaround time of the whole process, creating a rich feedback loop amongst the community and the sellers.
  2. Amenity attributions: Crowdsourced data provides great insights about deeper attributes and quality of amenities enriching our core hotel information. Examples include the size of the pool, quality of the breakfast buffet, kid-friendly features etc
  3. Passing authentic information to end-users: This data helps users in making better and informed booking decisions after gaining insights from peers on the quality of various amenities and facilities of a hotel.
  4. Creation of specific hotel collections: Crowdsourced data helps us in the creation of collections of a specific group of hotels basis the attributes that they have in common. For example, utilizing crowdsourced data, we enriched our information set for international hotels which are in proximity of Indian restaurants. The resulting hotels can be presented as a collection of hotels to the end-user with their highlight being “Properties near Indian restaurants”
  5. Collection of hitherto unknown data: With crowdsourcing, we have been able to collect hotel-related information that we weren’t aware of, earlier. For instance: additional details about Indian restaurants close to international hotels, relevant information on women-friendly and pet-friendly properties, and similar.

Crowdsourcing has helped us curate information about Indian restaurants near international hotels from verified bookers of those hotels. This information is utilized to further enrich our geoinformation systems.

And many other customers as well as hotelier side use cases.

Some manifestation of insights on the customer side

Some of the ways in which crowdsourced data is being used on the Goibibo platform are:

Highlighting and scoring aspects of a hotel

Highlighting intangible facilities of hotels: Crowdsourced data is used for highlighting the quality of intangible attributes of a hotel like its location, safety, cleanliness, etc. The display of these attributes assists in making more informed decisions and fair expectation setting about the hotel and its neighbourhood.

A sample location scorecard

Location And Neighbourhood Insights: Using crowdsourced data, we also create a location scorecard. This scorecard showcases various intangible features of a hyper location like connectivity and transit, popularity and safety.

Other notable parts

Details about some other notable features in the framework which make it more versatile

1) Collection of room-level data: As primary insights, we collect hotel or locality level data via crowdsourcing. The system can also be utilized to collect room level insights about various types of rooms and related attributes in various properties.

2) Collection of crowdsourcing data for other lines of Business: The framework has been designed with a generic approach and use-cases can be extended to other businesses apart from accommodation. Examples being cabs, bus or trains.

3) Priority order of data points: By adding priority level to questions, we will be able to ensure that high priority questions are asked more often from users for a particular hotel to arrive at richer and more fine-tuned final insights.

We are already collecting answers for nearly 100+ different information collection flows regarding hotels and are planning to add more. And it is just the beginning. 🙂

Crowdsourced collage of platform contributors: Dhruv, Nishant, Satyendra, Mohit, Prisha, Abhijeet, Rohit, Pankaj and Sahil

The Power of Community: Crowdsourced Insights was originally published in Backstage on Medium, where people are continuing the conversation by highlighting and responding to this story.

Building OTP verification component in react-native with auto read from SMS

$
0
0

Building OTP login in react-native with auto read from SMS

We at Goibibo always strive to deliver best user experience to our end users. I am the part of InGo-MMT team which is a B2B platform where end users are hoteliers. We have a desktop platform (Extranet) as well as mobile app for our hotel partners where they can manage their bookings, rates & inventory, promotions etc. One crucial thing we were missing in our app was login with OTP. Looking at our analytics data of login failure events and forgot password clicks, we knew that this has been a pain point for most of the hoteliers. On an average, around 200 hoteliers were daily visiting Forgot Password screen. We decided to implement OTP login in our app (and the best part was tech team took this initiative, thanks to Om) and I got chance to work on its Frontend.

Roughly 200 hoteliers were daily visiting Forgot Password screen in app

We divided this feature into 3 modules - Frontend, Backend and Caching layer (redis to store and track OTPs). Implementing Frontend was straight forward which included consuming token based authentication APIs, calling APIs for generating and verifying OTP etc but still we had few technical challenges while building OTP Verification screen in react-native and this is where things got interesting for me :D

On successful generation of OTP, next screen was Verification which had 4 text-input boxes for 4 digits OTP, a resend-OTP link and a submit OTP button. For this particular screen we had to build the following features-

  1. Auto focusing of TextInput boxes (auto focus to next TextInput box on entering an OTP digit)
  2. Timer for Resend OTP link (a resend OTP link which would be visible after 30 secs so we had to show a 30 secs timer)
  3. Clearing TextInput boxes in reverse order on pressing Backspace (auto clearing of previous TextInput boxes on pressing of Backspace key)
  4. Auto read OTP from SMS
  5. Auto submission of OTP (within 3 secs of OTP detection from SMS)

Let’s render some UI

UI was pretty much straight forward having four TextInput boxes and one submit button at the bottom.

OTP Verification UI

Auto focusing of TextInput boxes

While entering OTP, no one wants to type a digit, manually click on next input box, type 2nd digit and so on. Hence this was the very basic and very crucial step for a good UX.
To programmatically focus the next TextInput box while entering OTP digits, I assigned one reference to each TextInput box using useRef hook and handled the behaviour in onChangeText callback.

  // TextInput refs to focus programmatically while entering OTP
const firstTextInputRef = useRef(null);
const secondTextInputRef = useRef(null);
const thirdTextInputRef = useRef(null);
const fourthTextInputRef = useRef(null);
  const onOtpChange = index => {
return value => {
if (isNaN(Number(value))) {
// do nothing when a non digit is pressed
return;
}
const otpArrayCopy = otpArray.concat();
otpArrayCopy[index] = value;
setOtpArray(otpArrayCopy);

// auto focus to next InputText if value is not blank
if (value !== '') {
if (index === 0) {
secondTextInputRef.current.focus();
} else if (index === 1) {
thirdTextInputRef.current.focus();
} else if (index === 2) {
fourthTextInputRef.current.focus();
}
}
};
};
Added reference to TextInput boxes

Timer for Resend OTP link

Users may or may not receive OTP instantly. There can be numerous reasons for this e.g. network provider problem so it is important to provide user a Resend OTP option. We decided to show this link after 30 secs and to keep user engaged we had to show a timer.

Resend OTP Link (will be shown after 30 secs)

To implement this timer I used a state variable resendButtonDisabledTime

// in secs, if value is greater than 0 then button will be disabled
const [resendButtonDisabledTime, setResendButtonDisabledTime] = useState(
RESEND_OTP_TIME_LIMIT,
);
Conditional rendering of Resend OTP Link or timer text

Next I defined a function startResendOtpTimer which keeps decrementing value of resendButtonDisabledTime.

  const startResendOtpTimer = () => {
if (resendOtpTimerInterval) {
clearInterval(resendOtpTimerInterval);
}
resendOtpTimerInterval = setInterval(() => {
if (resendButtonDisabledTime <= 0) {
clearInterval(resendOtpTimerInterval);
} else {
setResendButtonDisabledTime(resendButtonDisabledTime - 1);
}
}, 1000);
};

I called this function from componentDidUpdate

  useEffect(() => {
startResendOtpTimer();

return () => {
if (resendOtpTimerInterval) {
clearInterval(resendOtpTimerInterval);
}
};
}, [resendButtonDisabledTime]);

Clearing TextInput boxes in reverse order on pressing Backspace

Since we are automatically focusing on next input box while entering OTP, it also make sense to clear previous OTP digits on pressing Backspace, besides it is also a good user experience. In react-native onChangeTextevent in TextInput will be fired only when there is an actual change in text, which means that it won’t be triggered on pressing BackSpace if text is already blank. This was the first challenge that I faced while implementing OTP Login. To achieve this functionality I had to register a listener on onKeyPress — onKeyPress={onOtpKeyPress(index)}

onKeyPress handler

One important thing to note here that this onKeyPress on Android will only work for soft keyboard.

Auto read OTP from SMS

This is a feature that is not critical for OTP Login but gives a wow effect if implemented. Initially we thought that we’ll have to read device messages for it which means we’ll have to ask for android.permission.READ_SMS permission from user which is a sensitive information. Thankfully SMS Retriever API exists in Android which expects SMS message to have a particular format and in return Google Play services will forward this message to our app. OTP Message must contain app’s hash for this feature to work, something like this-

<#> Dear User,
1091 is your OTP for logging into Ingo-MMT. (Remaining Time: 10 minutes and 0 seconds)
uTT+hcwZdg9

I used react-native-otp-verify package for this which internally uses Google SMS Retriver API.

Auto detect OTP from SMS

Auto submission of OTP

The last piece of this feature was to automatically submit OTP after 3 secs once OTP was read successfully from SMS. Similar to resend OTP link, I had to show a timer for 3 secs to keep user engaged. This was the most challenging part because I had to deal here the caching of variables in React hooks due to closure.

I used a state variable autoSubmitOtpTime for this.

{autoSubmitOtpTime > 0 &&
autoSubmitOtpTime < AUTO_SUBMIT_OTP_TIME_LIMIT ? (
<TimerText text={'Submitting OTP in'} time={autoSubmitOtpTime} />
) : null}

I also defined a function startAutoSubmitOtpTimer to show timer which I called once OTP was detected successfully.

  const startAutoSubmitOtpTimer = () => {
if (autoSubmitOtpTimerInterval) {
clearInterval(autoSubmitOtpTimerInterval);
}
autoSubmitOtpTimerInterval = setInterval(() => {
autoSubmitOtpTimerIntervalCallbackReference.current();
}, 1000);
};

One catch here is that I am using a reference autoSubmitOtpTimerIntervalCallbackReference callback created from useRef hook inside setInterval function because I required updated value of autoSubmitOtpTime state variable. Also I had to update reference variable in componentDidUpdate-

Conclusion

Final OTP Verification Component

OTP Login is a must have feature for apps. Currently we rolled out this feature to android and mweb (powered by react-native-web) while ios release is pending. Within a week of this release, we saw a 50% reduction in no of hoteliers visiting Forgot Password screen. We are sure that this feature will further boost adoption of our app.

Reduction in no of hoteliers visiting Forgot Password screen

Source code for this feature is available at
https://github.com/varunon9/react-native-otp-verification.


Building OTP verification component in react-native with auto read from SMS was originally published in Backstage on Medium, where people are continuing the conversation by highlighting and responding to this story.


My internship experience with Goibibo amidst COVID-19

$
0
0

Today as I end my internship, I would like to share my journey with you. Honestly, it is going to be tough to fit in, all the adventures of the last few months in this blog, but here it goes. I hope you find this a good read.

It all started with a call on the 5th of February, 2020 (I will never forget this date :P). It was a call for the final interview with Goibibo by the Associate Director, Mr. Om Thapa. Being inclined towards the backend side of development, and curious about frontend, I was little nervous about this interview. But after the process, I can tell you that they test your mind, and logic here.

The very next day, I received the call that I was selected as an intern and will be joining the ingoMMT Mobile team. I was ecstatic with the news. Now it was my chance to grab the opportunity and enter the best travel aggregator brand — Goibibo.

After a month of college, I joined the team on the 9th of March, 2020 and then the next four months were a roller-coaster ride. Today, I have a truckload of experiences and memories to share.

Day One :)

On the first day of my internship, I went to the Bangalore office with a bag full of excitement and nervousness. I was introduced to the entire team and it was the start of a wonderful journey.

The office, the culture, and the people working together were very welcoming. It felt like a family, and I was the new addition! I remember looking around curiously, at all the techies hustling from their workstation to the conference rooms and back. The overall environment was so energetic that the very next moment I was sure that this is the place where I want to see myself work and grow.

Post lunch walks with team :)

The ingoMMT is the hotels supply side team and I was assigned to its Mobile pod. I spent my first few days studying React.js and implementing applications using this technology. Those were the days of real grooming when I was introduced to the new ways of exploring, absorbing and presenting. During the internship I was assigned two buddies, Varun & Darshita, to guide me through this journey. I must say they took the term BUDDY quite literally :P

Then Came the WFH days 😐

In the beginning, lunch breaks used to be time where I used to get a chance to bond with the team. We would often find ourselves giggling and enjoying the talks. The post lunch walk was the best part of having a good conversation about trending technologies and current affairs. Talking of current affairs COVID was all over! Soon after my joining, work from home was declared due to COVID pandemic. My head was filled with thoughts and worries about the internship at same time. How will it go? How will I communicate? What if I get stuck with some problem? And what not! 😣 However the transition of work from office to work from home was made very smooth by the teams at Goibibo. Our days were very well structured with timely online sessions and assignments.

During my grooming period, I was given the chance to work on small applications to portray my learnings. Continuous feedback cycles with the mentors were helpful to understand the flow and user behaviour. My team members, including the manager, would regularly review my applications. Through this process I was able to understand the working of real life applications, UI & UX, responsiveness, test cases to target, and system behaviour. After several iterations the app was finally marked completed!

Jumping to the Codebase

Now it was time for the big revelation as I was finally going to be introduced to the main repository of the app. My excitement saw no bounds as I was finally going to start contributing to the main ingoMMT application.

Let me be honest, when I saw the number of lines of code and the files, my reaction changed from “Ohh yes!” to “Uh Oh!”. Thankfully, my team made the process easy by breaking the task into small subtasks so that I could target them one at a time. I would like to confess something here; what we call readability, reusability, and conventions in student life greatly differ from those followed in the real world. Initially, I used to get pointers on my coding conventions (:P) but with time and practice, I learnt the correct ways. Now this has become a habit and I have developed OCD about the way codes are written! 😈

I would like to mention an amazing activity that was introduced in my team. We called it Ingo JS Bytes. In this, we used to take a session on any topic or technology or upcoming changes in technology and share it with the teammates. This not only helped me in team bonding but also made everyone aware of the trends in technology. Many of these sessions were on (my) demand. I gained knowledge and a deep understanding of concepts by these sessions. I even took three sessions which gave me the opportunity to explore and share my learnings with the team. Thank you Darshita and Varun for this enriching experience.

Ingo Js Bytes sessions

Finally moving towards Projects :

  1. Internationalization (i18n-js) support to the ingoMMT app:

What is the project about?

Internationalization is the process of developing a software application to adapt it to various languages and regions without revisions in engineering, thereby enabling localization. This helps to make the localization implementation process easier.

Steps followed:

  • Identify and prioritize the languages to be supported.
  • Finding an acceptable solution for the end-user.
  • Approach for Static and Dynamic information: Solution for backend translation: client or server-side, API support for static fields

For the process, we used the Internationalization (I18n-js) library. The process includes extracting all the strings from the client-side and putting them into respective localized files. For strings extraction, I divided whole ingoMMT application into smaller modules and targeted them one at a time. In this process, I faced some challenges regarding structure of localized JSON file so that it is readable & maintainable. We resolved these with internal discussions and team efforts.

2. Whatsapp opt-in

Glimpse of WhatsApp opt-in

This includes following steps :

  • Click on the WhatsApp opt-in card displayed on the dashboard. It will redirect hoteliers to a page with feature information.
  • WhatsApp number is entered by the hotelier, which is verified by sending an OTP to the entered WhatsApp number.
  • Once verified successfully, the hotelier will receive notifications on WhatsApp.
  • Hoteliers can reach out to us by clicking the helpline number provided which will redirect to WhatsApp on the user’s device.

Along with these two major projects I got the chance to work on some tasks for the ingoMMT app such as tooltip message display, logo of the app etc.

Take Away

They say, “Surround yourself with insightful minds to grow effortlessly!” And this was proved to be true in this journey. During these tough times of the COVID pandemic, I could not have asked for a more productive lockdown.

PS : A big thank you to Om for motivating me throughout the process, sometimes through the stories about his journey and sometimes with motivational songs from the movie Lakshya :P.

While Darshita’s name is mentioned throughout the blog, you will not believe that I have never met her in person . Initially, when I had joined she was in Gurgaon, and then COVID happened. It’s an online relationship till now 😉 and I hope I get a chance to meet her soon.
I am grateful to Varun for answering the innumerable calls that usually started with “Hey Varun, need some help here ” :P.

I am really thankful for the best lockdown I could ever ask for. I would like to conclude this blog on a sweet note, I have been converted to a full-time Software Engineer at Go-MMT. I look forward to new learnings and adventures.

Cheers to the new beginnings!

Thank you for reading :)


My internship experience with Goibibo amidst COVID-19 was originally published in Backstage on Medium, where people are continuing the conversation by highlighting and responding to this story.

Journey of an Engineering Manager to an already existing Team

$
0
0
Earth-to-moon-journey-plan

Journey of an Engineering Manager to an already Existing Team

During an Engineering Manager life there comes a situation when he/she needs to take care of an already existing team. This situation can come up when you move to a new organisation or you get an additional responsibility to manage a team. This challenge is different then building a new team from scratch because of the following reasons -

  • The existing team has their own history
  • The existing team may not welcome new member easily
  • They might have gone through different seasons of managers
  • Change is inevitable but different to adopt and accept
  • Motivation level of the team
Disclaimer — Below observations & techniques are purely based on my work experience. It may or may not suit your personality but an Engineering Manager is the most AGILE person in the floor to accept the changes and make you believe that — Change is Good…

1) Understanding Team Dynamics

understanding-team-dynamics

When you take over an existing team, understand the team structure first and the intra team dynamics. It is very important to understand each and every individual’s role in the team which means you might need to perform 1:1 with team members before you jump on the highway. This is what you record as “documentation” for future managers and if you are lucky you will receive one from the previous Engg. manager.

Observe, DO NOT take every previous opinion by default and you can build your own perspective over a period of time.

2) Clear Prioritisation

clear-prioritisation

When you join a new team understand what is the priority as per the current org need and where they are standing. Now since you are a part of the team the success/failure totally lies with you too. It can be anything like product roadmap or enhancements or system migration or some burning issues in the production.

Prioritisation eg.

After analysis we decide that production issues & fixes are clearly the high priority compared to improvement or cleanup of the system.

3) Documentation

necessary-documentation

First thing first an EM should always believe in documentation/wiki and should try to “Decentralise the knowledge” rather than keeping it centralised in human minds. We had set up a process that very weekend “Each One, Create One” page in Confluence on whatever topic team has worked on in past and over a period of time we had more than 300 pages.

Remember the team loves to document their modules but they never get time to do it.

Block calendar with the team, sit with them, order tea-coffee and start documenting all must-to-have items in centralised repositories.

4) Training

training

Try to understand if there is a need for tech/soft skills training required in the team or individual needs. During this course either you can take the lead or let some experienced one take the ownership of Training for eg. In my team I take the lead and keep all my KT presentations in SlideShare :)

Always promote cross team training of various internal modules/tech stack.

5) Tech Enhancement/Fulfilment

tech-initiative-enhancements

Though we wanted to attack the production issues + product tracker tasks on priority we should also focussed on how can we improve the tech stack of the team thus requires Tech Initiatives (apart from regular work, team needs to perform R&D and implement the solution regarding Logging, Alerting, Monitoring & Infrastructure)

This particular step helps the team to think positive if there was void in this area since long. Engg. Manager can think of different tech initiatives for eg.

  • ECS to EKS Migration (for infra enthusiast dev members)
  • Automation Integration (for QA dev members)
  • Fine-tuning logging, alerting & monitoring (for any dev members)
  • Infra cost optimisation or DB optimisation (for any dev members)

6) Transparency

transparent-communication

This is one of the most important step since you need to set the clear picture to the team about which direction/roadmap the org wants your team to go. Keep them aware of the latest happening around product & tech. Keep the team engaging but always close to reality. This means DSM and Weekly SyncUps.

P.S — Always make sure that you are not passing on too much information that your own pressure gets passed on to the team members. Team requires the right direction and NOT over expectation of higher mgmt.

7) Data & Analytics

data-analytics

A product can not enhance without data analysis and a system can not enhance without proper logs/alerting/monitoring in place thus we should focus on daily numbers and it should be discussed openly within the team.

These data source can be accessed via various tools in your organisation -

  • Log Dashboards
  • redShift Data Dashboard
  • Alerting/Monitoring on APM Dashboard
  • Web analytics data on GA + GTM
  • App analytics data on Firebase + GTM

Make these tools easily available to the team so that they can feel associated with their product/module and are aware of the ups and down of the system by data points.

8) AGILE & SPRINTs

backlog-sprint-iteration-agile

Once the prioritisation and initial understanding is done team should start running daily stand ups on time. At this time Engg. Manager has to play the role of Scrum Master also. Try to move away from man hours to story points based on the complexity of the stories. This will help the team to easily track the numbers under SPRINT Velocity Chart in terms of story points

IMO — Man hours puts the team member under pressure while Story Points are relative numbers 1, 2, 3, 5, 8, 13, 21 (the complexity of the story remains same for anyone in the team and we use Fibonacci series for the same)

Backlog Grooming & SPRINT Planning are part and parcel of the process but we should focus on SPRINT RETROSPECTIVE (Good/Bad both) Iterate it again unless you find the velocity of the team which is — story points per team member.

9) Bug Bash (if needed)

bug-bash

To attack the production issues in bulk, collect it, wait for the right time and dedicate a day to go for the KILL — Here QA team should play a vital role to collect the bugs based on severity. We should make sure that will dedicate a complete day for the same, develop, test and release the next day.

This exercise should be completely based on teams feedback if they think there is a need or they want to clear some Technical Debt too.

10) Processes (if needed)

much-needed-processes

As I always say any repetitive problem can be solved via process. This holds good when you take over a new team too. Repetitive problems like ad-hocs coming from product/stakeholders should be captured and distributed with escalation matrix. Few processes we learnt and implemented over time are -

  • Should have a dedicated EMAIL DL
  • OnCall process for ad-hoc issues (Weekly)
  • Tech KT Sessions (Monthly or Bi-Weekly)
  • Friday Bug Bash (Monthly or Bi-Weekly)
  • Weekend Documentation etc. (Weekly) etc

Hope this experience will help the young leaders/managers out there to run their own check-book when they take responsibility of an existing team.

You can add your own steps to the above list because each leader has their own work style and not all initiatives work for each team but it’s good to be aware of someone’s experience :) #EgineeringManagerHacks

Om Vikram Thapa

Follow me at @Twitter — https://twitter.com/OmVikramThapa

@LinkedIn — https://www.linkedin.com/in/om-vikram-thapa-82090284/


Journey of an Engineering Manager to an already existing Team was originally published in Backstage on Medium, where people are continuing the conversation by highlighting and responding to this story.

Enigma — A GraphQL abstraction

$
0
0

Enigma — A GraphQL abstraction

Enigma, which shortened WW2 by 2 years saving millions of lives

When we talk about web services, one of the things that comes to our mind is how would they talk to each other and that is where we think about apis and when we talk about api design the first thing that comes to our mind is Representational State Transfer (REST).

Before going to REST let’s see what typical HTTP client server architecture looks like:

Fig1 — HTTP Request Response Architecture

The above image depicts a HTTP client sending a HTTP request (GET, POST, DELETE) to the specific route on a web server and the web server after performing action sends the HTTP response back to the client as simple as that and then came in REST.

Representational state transfer (REST) is a software architectural style that defines a set of constraints to be used for creating Web services. The services which follow REST architecture allow the requesting systems to access and manipulate textual representations of web resources by using a uniform and predefined set of stateless operations.

Stateless servers and structured access to resources facilitated the client server interaction so much that it became popular and with the wide range of supported client applications and multiple data formats(Plain text, HTML, XML, JSON), REST became widely accepted as the de-facto API design standard.

Fig2 — Multiple REST clients interacting with REST server

So, what went wrong?

In the beginning at around Y2K, the client applications were relatively simple, scale and complexity of the systems were low. But now the business scenarios have become complex and more data driven as ever. With increasing and excessive use of both web and mobile applications the need to provide a seamless client server interaction has become one of the prime requirements. REST apis are strictly bound to a response contract a.k.a response object which makes it difficult to build an api that satisfies the needs of all the variety of clients. Also with rapid increase in demand of apis it has become difficult to keep up the pace of development with client requirement as both client and server need changes whenever there is a change in the requirement.

The problem:

May day! May day! My day!

As a leader in hotels and travel industry, we at ingoMMT (a hotel supply facing team at GO-MMT), were facing ever increasing need of data insights on mobile and web apps to help our suppliers understand their business better and to act swiftly. To fulfil the increasing demand to more and more data on our dashboards we were developing tons of features to present the data and ton of features means calling tons of apis and calling tons of apis means higher response time along with management of tons of apis. Soon our system had become complex and to serve a single dashboard feature we ended up calling 10’ and 20’s of backend apis and then handling their response in a presentable manner. That’s when we looked for a BFF, a best friend forever a.k.a Backend For Front End which did become our best friend forever 😌

Came to our rescue GraphQL,

GraphQL is a modern alternative to REST architecture as it solves a lot of bottleneck and short comings of REST. As per the official definition

GraphQL is a query language for APIs and a runtime for fulfilling those queries with your existing data. GraphQL provides a complete and understandable description of the data in your API, gives clients the power to ask for exactly what they need and nothing more, makes it easier to evolve APIs over time, and enables powerful developer tools.

Let’s understand a bit about terminologies and features of GraphQL which would elevate our understanding of how it solved the problems and shortcomings of REST and why it is the need of the hour.

Gives clients the power to ask for exactly what they need here and nothing more:

This is one of the most important features and my personal favourite too. Giving client the power about what it needs single handedly solves the problem of strict binding of request and response structure of REST. Client sends query to GraphQL and can request and get exactly what it needs. The power lies with the client applications here and this makes client applications more flexible because they control the data they get and not the server.

Get many resources in a single request:

GraphQL queries access not just the properties of one resource but also smoothly follow references between them. While typical REST APIs require loading from multiple URLs, GraphQL combines multiple API call’s data into 1(as and when required) without modifying the request and response format. Lovely isn’t it 😍

Describe what’s possible with a type system:

GraphQL apis are organised in terms of types and fields, not endpoints. Access the full capabilities of your data from a single endpoint. GraphQL uses types to ensure client applications only ask for what’s possible and provide clear and helpful errors. Client applications can use types to avoid writing manual parsing code.

Powerful developer tools:

GraphQL gives a powerful utility GraphQL playground to developers to work upon and get clear understanding of what data you can request from your api and also highlighting the potential issues in the query before actually sending the query.

Evolve your API without versions:

Add new fields and types to your GraphQL API without impacting existing queries. By using a single evolving GraphQL’s schema version, GraphQL apis give apps continuous access to new features and encourage cleaner, more maintainable server code.

From the traditional architecture of calling multiple apis and then combing there responses to a presentable form to the new GraphQL architecture we came out stronger than ever.

We started leveraging each of the above mentioned GraphQL features and with few GraphQL’s schemas and power of GqlGen we were able to build up a production Golang server which started serving our front-end dashboards for both mobile and web. We call it Enigma.

Why are we calling it enigma? because we were watching a movie The Imitation game, when we were building our GraphQL server. “Enigma (an encryption device used by germans) which played a major role in the outcome of the WW2”, was a simple looking but under the hood was doing highly complex tasks to deliver the messages safely. While it took years for Alan Turning to break it, this one here doesn’t take an Alan Turing “to break the code”. Here is what we did:

The GraphQl way:

Fig3 -Enigma high level design

On left side of the above high level design we see different types of client applications interacting with enigma server which is internally powered by GraphQL. The GraphQL internally interacts with enigma-workflow (a parallel execution framework that we built to execute any network and database workloads). On the extreme right lie all the backend REST apis.

The GraphQL way is schema driven. There are two types of operation which client can perform Query and Mutation. But what resources and data fields are available for query and mutation are defined by GraphQL’s schema which lies at the very core of GraphQL. The entire query and mutation apis revolve around the ever evolving schema. To get a better understanding below are the components of the GraphQL server:

  1. Schema: The schema defines what queries are allowed to be made, what types of data can be fetched, and the relationships between these types.
  2. Resolvers: Resolvers are the functions which handle your client’s query or mutation requests.

If you are completely new to GraphQL and GqlGen you could follow the getting started guide here.

“But how the execution takes place ?”

Below is the detailed execution sequence of any typical request that client sends to enigma.

Any incoming client request lands on the gin implementation of GraphQL server (GqlGen) and is sent to auth middleware for authentication and authorisation. Post successful auth a JWT token is added to the request and it lands on the resolver. Here GraphQL smartly maps the Query/Mutation to the respective resolver and a list of backend apis which serve the Query/Mutation are called in parallel with the help of enigma-workflow and all the responses are captured and a complex response object is generated which is returned by resolver. But the magic happens here, resolver returns only those set of fields which are requested by client in the Query/Mutation. This gives fundamental freedom to only request and get what is needed without changing implementation.

Fig4 - The entire ecosystem

The rest of the architecture is pretty straight forward and labelled. The server uses redis for caching and logs the transaction related metrics to New Relic. The server publishes the logs on stdout and a side car container which runs a sumo collector is launched in coordination with main application container which watches the stdout of the application, collects all the logs and pushes them to Sumo Logic.

So what we achieved with enigma so far?

  1. Merge complex systems and micro-services in one single schema.
  2. We were able to fetch data from multiple APIs with a single API call.
  3. We were able to fetch the data and fields, exactly those which were required - nothing more nothing less.
  4. Up-to-date API documentation of all the APIs available, as any schema evolution is automatically taken care by GraphQL and the API documentation is updated automatically.
  5. We were able to re-use various fields in various segments as multiple root components can have same child objects and segments.
  6. With GraphQL playground enforcing the types and fields available for querying made the development process fast as it immediately points out the schema mismatch. This gives client a detailed view of what is possible to achieve in a query.
Fig 5 — Books query showing embedded author details

Fig 5. shows how you can query two embedded objects namely books and author on GraphQL playground. In the leftmost panel a query is defined which asks GraphQL to return the requested fields which are returned as a json on the middle panel. The right most panel shows the documentation of each query available.

Fig 6 — Right most panel shows fields and their types available

Fig 6. shows the same query but in this query we didn’t request the book id in the author object and hence we didn’t get book id in the json response. The rightmost panel shows fields and types of the fields available which client applications can request for.

Things you should be careful of:

  1. One should always be care in making a schema which is reusable and as modular as possible. One segment can be used in multiple root objects.
  2. DO NOT couple high SLA APIs to a bunch of moderate SLA APIs as it would skew the response time of all the APIs and the response object as a whole.
  3. Use appropriate caching only as and when required because GraphQL is a stateless layer between your frond end and backend.
  4. Invest good time designing a workflow which would execute 100’s of APIs in parallel or in most efficient way possible.
  5. Always put logging, alerting and monitoring in place as enigma or bff layer can become bottlenecks too (if not implemented correctly). Your system maybe the best in class but it will go down. So, Monitor and be Alert!!

World is changing and so is its demand.. End users are becoming more and more impatient. To capture the audience we need high performance systems be it backend or frontend. A delay of milli-seconds in rendering the data can cost you millions of Dollars and in the world where “Data has become the new oil”, we need applications that can provide insights at minimal latencies, while keeping the architecture as simple as possible.

As per Moore’s Law —

The number of transistors in a dense integrated circuit (IC) doubles about every two years - Gordon Moore.

Similarly the complexity of real world problems and systems is only going to increase in future. With such evolving nature of tech and the problems we are solving it is highly uncertain when will our next bottle neck arrive. We have come a long way from traditional HTTP architecture to GraphQL and systems will keep on getting more and more complex in the future. Client applications have been evolving ever since and the same goes for the servers handling the requests, so it’s difficult to say that we have achieved the best.


Enigma — A GraphQL abstraction was originally published in Backstage on Medium, where people are continuing the conversation by highlighting and responding to this story.

PRICE LOCK: DEPLOYING TECH TO MAKE YOUR TRAVEL MORE FLEXIBLE

$
0
0
price-lock-in-travel

PRICE LOCK: DEPLOYING ARTIFICIAL INTELLIGENCE TO MAKE YOUR TRAVEL MORE FLEXIBLE

We are all familiar with this traveller dilemma while booking travel — should I book flights right now while price looks enticing or should I wait till I can button down my travel plan till its last detail and end up shelling out more. After all, if you book and pay the entire fare upfront and your plan doesn’t materialise, you will have to pay a hefty cancellation/amendment fee to the airline. Au contraire, waiting till the very end will most likely see you pay a lot more for the same flight.

Now worry not, because technology is a wonderful thing that is taking the trouble out of travel planning. And we are proud to introduce Price Lock — an industry-first feature in India that will make travel planning a breeze while saving you money and giving you more time to plan.

What is Price lock?

Price lock is a feature which allows customers to reserve their seats for a minimal fee without paying the actual price of the ticket upfront and secures flyers against any price hike by allowing them to purchase the ticket at the same locked-in price later. The fee paid by the user gets adjusted against the flight fare, so customer does not need to pay anything extra.

Price lock allows customers to buy more time while they firm up their travel plans. This addresses the needs of customers who are unsure of their travel plans but are also worried about price rise. These customers either drop off, or purchase tickets at a very high price later, or end up cancelling, thus paying heavy cancellation charges.

How can a user avail price lock?

Price Lock icon will be visible against a given itinerary on the search result page if price lock option is available. User needs to swipe the card left to see the price lock option which will show the details and user can proceed to payment.

Locked itinerary will appear on the flights home page and also on the MyTrips section. User can come back any time before expiry date to complete the booking.

The science behind price lock

With millions of transacting customers, Goibibo has rich data and insights on customer booking behaviour. This historical data helps us build a machine learning model to predict the probability of a price rise within a certain duration like 24 hours or 72 hours. The model considers various factors such as sector and itinerary demand, seasonality, AP (advance purchase period) along with customer preferences for time, airlines, and competition on flight sectors to decide whether to offer Price Lock for a given itinerary.

The machine learning model learns the change in availability and price of various fare classes (called RBD: reservation booking designator) on hundreds of airline routes and how these changes are correlated with various signals that capture demand:

· Fare RBD specific demand (number of seats sold so far)

· Total number of searches for this itinerary

· Total number of searches and bookings for a specific sector

· Demand at a certain fare for a given AP (advance purchase period)

We are excited to introduce Price lock feature across the busiest sectors and we aim to scale this across the board as the model learns more with time. We are just getting started!

About the Author

Madhu Gopinathan is a Senior Vice President, Data Science at goibibo. He has extensive experience in developing large scale systems using Machine Learning and Natural Language Processing tools.

He holds a PhD in Mathematical Modelling of Systems from the Indian Institute of Science, Bangalore and an MS in Computer Science from the University of Florida, Gainesville, USA. In the past, Madhu has collaborated with researchers at Microsoft Research, General Motors and Indian Institute of Science on various research papers. Additionally, he has also been granted several US patents.

Co-Authors:

· Rudra Roy, VP Product , https://www.linkedin.com/in/rudrak/

· Avinash BR, Director Engineering, https://www.linkedin.com/in/avinash-br-2085691b/

· Tarang Agrawal, Lead Data Scientist, https://www.linkedin.com/in/tarang-agrawal/

· Nikhil Kumar, Senior Product Manager, https://www.linkedin.com/in/nikhil745/

· Astha Goel — UX Design ,https://www.linkedin.com/in/asthagoel/


PRICE LOCK: DEPLOYING TECH TO MAKE YOUR TRAVEL MORE FLEXIBLE was originally published in Backstage on Medium, where people are continuing the conversation by highlighting and responding to this story.

Chat with Hotelier, when you make a booking on Goibibo & MakeMyTrip

$
0
0

Praneet is a frequent traveller. He is planning to celebrate new year in Goa so he booked a hotel near Baga beach. Booking was successful but Praneet has some queries regarding hotel services and location. He is wondering whether he would be allowed for an early checkin and whether he could be picked from the airport. He plans to invite his friends to his stay so he needs to know whether visitors are allowed in hotel or if some arrangements can be made.

Lakshimanth owns a hotel in Goa. For the new year celebration, he has arranged a special dinner for his customers at very nominal rate. He is looking for a convenient way to advertise this to his customers as soon as they make a booking. He wants to get few advance bookings for this special dinner to make his preparation better.

Above stories of Praneet and Lakshimanth are not unique. This is a common situation for most of the customers as well as hoteliers. If Praneet made a successful booking then he can talk to customer support executive or directly call hotelier to resolve his queries. For Lakshimanth, post booking he can reach out to his customers over email or phone to advertise about his special dinner.

But what if Praneet wanted to get his queries resolved before he made any booking? Even after successful booking, can the conversation between two parties be made more smooth?

We at Go-MMT continuously strive to deliver best experience to our customers as well as hotel partners. In an effort to provide a delightful experience to above scenario, we have introduced a new feature — “Chat with Host” for our customers and “Guest Messages” for our hotel partners. This feature is available for both pre-booking as well as post-booking.
Guest Messages on ingoMMT app, Chat with Host on Goibibo app and Contact Host on MakeMyTrip app

Chat with Hoteliers

Customer chatting with hotelier on Goibibo and MakeMyTrip app

We started showing chat option on Booking confirmation page for pre-booking and on My Trips page for post-booking. Go-MMT receives thousand of queries per month related to booking and hotel. Most of the queries are regarding early check-in, amenities related, pay at hotel related, hotel policies, late check-out etc. Beside queries, customers also seek for some requests like additional meal for children, extra bed, room with a specific view, special assistance (baby sitter, wheel chair) etc. With this new feature released, all of such customer pain points would be resolved in a few exchange of messages.

A comparison between Pre & Post booking chat features

Covid Effect & Alternative Accommodation

Alternative accommodation segment (we internally call it Alt-Acco) includes villas, apartments, homestays, guesthouses and hostels, among others. Both Goibibo & MakeMyTrip host this segment as we want to empower our customers with more and more choices so that they always find the best fit. Alternative accommodations offer quality yet economical, offbeat options. We believe that in post Covid era this segment is going to grow more popular and we are continuously investing in this segment. Feature like Pre-booking chat is crucial for these properties owners.

Guest Messages

Host chatting to guest on ingoMMT app

Chat can be initiated in both ways, either by customer or by hotelier. As soon as a booking is confirmed by hotelier, an entry starts appearing under bookings tab where he can initiate a new conversation. Hotelier can see and reply chats under Guest Messages section.

We have also empowered hoteliers to schedule automatic messages e.g. hotelier can send a welcome message or house policy rules automatically to all customers a day before check-in. He can then automatically send Wi-Fi details to customer just after check-in.
We are sure that this feature will be very handy in responding to general queries raised by customers.

Hoteliers can create and schedule templates e.g. a welcome message to customer 2 days before check-in

Under the hood

Execution of this project involved multiple teams (design + product + tech) on both the sides- B2C/Funnels (Goibibo & MakeMyTrip) meant for customers as well as B2B (ingoMMT) meant for hoteliers. At the centre of this project lies the Cloud Firestore- a flexible & scalable NoSql database for mobile, web, and server development from Firebase and Google Cloud. We have leveraged its realtime listeners and expressive querying to power our chat platform.

Firestore is the centre of our chat platform

Our ingoMMT app is built using react-native and below I am summarising the Frontend challenges that we encountered while developing the Guest Chat application.

Developing a chat application in react-native

Building a simple chat application using Firebase is really quick and easy however building a production ready app requires some effort. These are the challenges that we faced in react-native along with the proposed solution that we used-

1. Pagination of Chat messages

To show real time chat messages you’ll have to attach listener to the collection with onSnapshot() method. Also chat messages can grow huge so best practice would be to paginate the documents i.e. fetch more messages in batch when user scrolls to top. One approach could be combining onSnapshot() & limit() methods-

const [chatsLimit, setChatsLimit] = useState(8);
const unsubscribe = getGuestChatMessagesQuery(sessionId)
.orderBy('time', 'desc')
.limit(chatsLimit)
.onSnapshot(querySnapshot => {}, error => {})

Here you can keep increasing chatsLimit state variable when users hits the top of scrollbar. The downside of this approach is that size of snapshot listener will keep increasing which is not good for performance. Best way to get paginated data would be using query cursor something like this-

getGuestChatMessagesQuery(sessionId)
.orderBy('time', 'desc')
.startAfter(startAfterTime)
.limit(MESSAGE_LIMIT)
.get()
.then(querySnapshot => {})

However this will be one time operation and we still need a listener to monitor new upcoming messages. What we used is combination of these two approaches. We attached listener to last few messages and kept on retrieving others using cursor. You can check our solution on this StackOverflow thread. Note that if you are just interested in monitoring new messages then you could listen for only one recent message. In our case we check for messages delivery status as well so we listen for last few messages.

2. Showing most recent chats first

We are using FlatListto show our chat messages. To show recent messages first, you can retrieve it based on time orderBy('time', 'desc') and then reverse it using Array.reverse(). But with this approach you’ll have to manually scroll the FlatList to the bottom on every list update. Instead of this we used inverted props of FlatList-

render () {
<FlatList
contentContainerStyle={GenericStyles.p16}
inverted
data={[...recentChats, ...oldChats]}
renderItem={renderFlatListItem}
keyExtractor={item => item.messageId}
onEndReached={onChatListEndReached}
onEndReachedThreshold={0.2}
ListFooterComponent={moreChats ? <ActivityIndicator /> : null}
/>
}
inverted FlatList renders the items from bottom which is what we wanted

3. Auto expandable chat input box

We wanted our message reply text input to auto expand based on content. One solution that we tried is passing dynamic value to numberOfLines prop to a multiline TextInput-

const getNoOfLines = () => {
return inputMessage.split('\n').length;
};
render() {
<TextInput
multiline
numberOfLines={getNoOfLines()}
onChangeText={onMessageInputChange}
value={inputMessage}
/>
}

This worked well when user manually typed Enter key while typing a message but it didn’t work for overflow message. We finally used onContentSizeChange callback to dynamically adjust the height of Text Input-

const [textInputHeight, setTextInputHeight] = useState(20);
const updateSize = height => {
setTextInputHeight(height);
};
const heightStyle = { height: textInputHeight };
render() {
<TextInput
style={heightStyle}
multiline
onContentSizeChange={e => updateSize(e.nativeEvent.contentSize.height)}
onChangeText={onMessageInputChange}
value={inputMessage}
/>
}
Auto expandable chat input text

4. Performing Firestore ineqality query on two different fields

For our hotel partners, we have provided them search & filter messages functionality. Filters will get applied on top of search. During one such filter we had to apply two inequality Firestore operators on two different fields.

let query = getGuestChatSessionsQuery();
// search by guest name
query = query
.where('nameOfCustomer', '>=', searchText)
.where('nameOfCustomer', '<=', searchText + '\uf8ff');
// unread messages filter
query = query
.where('unreadCount', '>', 0)
.orderBy('unreadCount');
search + unread query

However as of now Firestore has this limitation that you cannot apply inequality operators on two different fields. To overcome this we applied search in query and took care of unread messages filter in client side (common sense :p).

5. Search by Prefix in Firestore

We have provided our hotel partners “Search by Guest name” functionality. So if hotelier types Va , It should match with customer names that start with this prefix e.g. Varun Vaibhav Varun Kumar etc. For this we used >= and <= operators.

query = query
.where('nameOfCustomer', '>=', searchText)
.where('nameOfCustomer', '<=', searchText + '\uf8ff');

Here character\uf8ff is a very high code point in the Unicode range. Because it is after most regular characters in Unicode, the query matches all values that start with searchText
However this will be a case sensitive search due to exact match. To overcome we can have two approaches-

  • Always store nameOfCustomer field in lowercase in Firestore and manually convert searchText to lowercase before executing query.
  • If storing nameOfCustomer in lowercase affects your business logic, then create a new field in Firestore nameOfCustomerLower and store lowercase value to it. Use this new field for query.

Impact

Guest Messages Demo GIF

We already had Guest Chat feature in our ingoMMT app rolled out last year. This time we added Pre-Booking Chat feature along with some major revamp to existing features. Pre to Post booking conversions and overall satisfaction of our customers as well as hotel partners are some of our key Metrics. Seeing the vaccination started & number of Covid cases coming down, we can say that Covid-19 is fading and travel is bouncing back. We have already started getting 70–80% of Pre-Covid traffic on our platform and this feature is our preparation to future.

Conclusion

We have plan to add Auto Suggest & Broadcasting feature in coming releases. Along with these we are also looking for some enhancements like Chat Analytics, Quick Links, Location sharing, Request to Book etc. We are confident that these new features will further ease hotelier’s business and take Guest Messages feature to next level.


Chat with Hotelier, when you make a booking on Goibibo & MakeMyTrip was originally published in Backstage on Medium, where people are continuing the conversation by highlighting and responding to this story.

Viewing all 103 articles
Browse latest View live


Latest Images